

That spongy, unresponsive feeling when you pull your brake levers is more than just an annoyance—it's a real safety hazard. Learning how to properly tighten your bicycle's brakes is one of the most valuable skills a cyclist can have. It puts you in control, builds confidence, and makes every ride safer and more enjoyable.
Why Perfect Brake Tension Is Non-Negotiable
Think of your brake system as a direct line of communication between your hands and your wheels. If that line has too much slack, your reaction time slows down, and your stopping distance gets dangerously long. This guide will walk you through the practical, hands-on steps to keep that connection sharp and responsive.
Before you can fix anything, you have to know what you're working with. While every brake system aims for the same goal—stopping you safely—how they get there varies. You'll almost certainly have one of these three types on your bike:
- Rim Brakes: The old-school standard. These have brake pads that physically squeeze against the rim of your wheel to slow you down.
- Mechanical Disc Brakes: These use a steel cable, just like rim brakes, but instead of squeezing the rim, they operate a caliper that clamps pads onto a metal rotor at the center of the wheel.
- Hydraulic Disc Brakes: The most powerful option. These use a sealed system of hydraulic fluid instead of a cable to push the caliper's pistons. The feel is often smoother and requires less hand strength.
Understanding Your System
The push for better, more reliable brakes is huge right now. In fact, the bicycle brake lever market is expected to hit USD 6.8 billion by 2035. This boom is largely fueled by more people commuting by bike in cities and the explosion in popularity of e-bikes, which absolutely need serious stopping power.
Knowing which system you have is the first and most important step. It dictates which tools you'll need and what you'll be adjusting. This knowledge is a fundamental part of responsible riding and a core element of overall electric bike safety tips, especially for those on heavier, faster e-bikes.
My Two Cents: Perfect brake tension isn't about making the lever impossible to pull. It's about finding that sweet spot where you eliminate the "dead" travel, so the pads bite down exactly when you expect them to. That balance is what gives you true control.
To help you figure out what you're looking at, here’s a quick reference table. It’s a simple cheat sheet to identify your brake type and where you'll be making the primary adjustment.
Quick Guide to Brake Types and Primary Adjustments
| Brake Type | Key Identifier | Primary Tightening Method |
|---|---|---|
| Rim Brakes | Pads press against the wheel rim. | Adjusting the barrel adjuster or cable anchor bolt. |
| Mechanical Disc Brakes | A caliper squeezes a central metal rotor; uses a visible steel cable. | Fine-tuning the barrel adjuster and caliper pad dials. |
| Hydraulic Disc Brakes | Caliper squeezes a rotor; no visible cable, uses a sealed fluid line. | Adjusting lever reach and caliper alignment; no cable to tighten. |
Once you've identified your system using the table, you'll be ready to dive into the specific steps for your bike.
Getting Your Rim Brakes Dialed In
Rim brakes are the classic workhorse of the cycling world, and for good reason. They’re wonderfully simple, lightweight, and something you can absolutely learn to adjust yourself. If your brake levers feel spongy or you have to pull them clear back to the handlebars to get any stopping power, a few quick tweaks will bring back that crisp, responsive feel you’re looking for.
Let's start with the easiest fix, which often solves the minor cable stretch that happens over time. Best part? No tools needed. You can even do this one on the side of the road if you feel things getting a little loose mid-ride.
The Quick Fix: Your Barrel Adjuster
Take a look at your brake lever, right where the cable housing enters the lever body. You'll spot a small, knurled knob—that's the barrel adjuster. Think of it as a micro-tensioner. Turning it effectively changes the length of the cable housing, which in turn tightens or loosens the brake cable.
To add a bit of tension, simply turn the barrel adjuster counter-clockwise, like you're unscrewing it. This moves it away from the lever, pulls the cable tighter, and nudges the brake pads closer to the rim. I usually do this a half-turn at a time, giving the lever a squeeze after each little adjustment to feel the difference.
If you find yourself unscrewing that barrel adjuster more than halfway and the lever still feels soft, it's time to do a proper reset at the brake itself. Screw the adjuster almost all the way back in (clockwise), but leave it out by a turn or two. This gives you room for future fine-tuning and sets you up for the next step.
My Two Cents: Always start a major adjustment with your barrel adjusters screwed most of the way in. This way, you have plenty of room to either tighten or loosen your brakes with a quick twist when you're out on a ride, saving you from having to break out the multi-tool.
For a Major Tension Adjustment
When the barrel adjuster just won't cut it, you'll need to manually pull more cable through at the source. Grab your 5mm Allen key, because you're going to loosen the cable anchor bolt on the brake caliper—that's the little bolt clamping the end of your brake cable.
Loosen the bolt just enough for the cable to slide, but don't take it all the way out. Now for a little shop trick to get the tension just right without any fuss:
- Use one hand to squeeze the brake arms together until both pads are pressing firmly against the rim.
- With your other hand, pull the cable taut. You'll feel all the slack disappear.
- While still holding everything in place, tighten that anchor bolt back down. Make sure it's good and snug.
Now, let go. The brake arms should spring open, leaving a nice, small gap between the pads and the rim—ideally around 2-4 millimeters on each side. Give the brake lever a good squeeze. It should feel firm and engage much earlier than before.
Centering Your Brakes for Even Pad Wear
After setting the tension, you might notice one pad is rubbing or is way closer to the rim than the other. This is super common and thankfully, an easy fix. Uneven brakes wear out pads faster and just don't stop as well.
Most rim brake calipers have a tiny centering screw, usually found on the top or side of the caliper body.
- Turning the screw clockwise usually shifts the whole assembly to the right.
- Turning it counter-clockwise shifts it to the left.
Make small adjustments—a quarter turn is a good start—and check the spacing. Give the lever a few hard squeezes to let the caliper settle into its new position. The goal is to get that gap perfectly even on both sides.
Nailing the Brake Pad Alignment
This is the final, and most critical, detail. If your pads are aligned poorly, you can get awful squealing, chew up your tire's sidewall, or—worst-case scenario—have a pad slip under the rim during a hard stop. That's a crash you don't want to have.
Using your Allen key, loosen the bolt that holds the brake pad to the caliper arm. You just need it loose enough to wiggle the pad around.
Here’s what perfect alignment looks like:
- The pad should hit the dead center of the rim's braking track—not so high it touches the tire, not so low it risks diving underneath.
- It should sit perfectly flush against the rim, following its curve.
- It absolutely cannot touch the tire. Ever. This can cause a dangerous blowout.
Once you've got it just right, hold that pad firmly in place with one hand and re-tighten the bolt with the other. Do the same for the other side. One last check by squeezing the lever hard should show both pads making solid, even contact at the same time. Now you’ve got stopping power you can trust.
Dialing In Your Mechanical Disc Brakes
If you've got mechanical disc brakes, you've already got a serious advantage in stopping power and all-weather performance over old-school rim brakes. While they use a familiar cable system, the adjustment process is a bit different. It’s all about a two-part harmony: getting the caliper's pads in the right spot and setting the perfect cable tension. Nail this balance, and you'll be rewarded with a rock-solid lever feel and a blissfully silent ride.
Unlike rim brakes that squeeze evenly from both sides, most mechanical disc brakes have one pad that stays put (the inner pad) and one that moves when you pull the lever (the outer pad). The whole game is to get that stationary inner pad as close to the brake rotor as you can without it touching. This little trick minimizes how much the rotor has to flex to make contact, which translates directly into a more responsive, powerful feel when you need it most.
These reliable stoppers are a big deal in the bike world. The global market for mechanical disc brakes was pegged at around USD 526.9 million in 2024, and it's only expected to climb. As more people turn to bikes for green transportation, the demand for brakes that people can actually work on at home just keeps growing. You can discover more insights about the bicycle mechanical disc brake market on gminsights.com.
This visual guide shows the three core adjustment points that are key to getting any cable-operated brake, including mechanical discs, set up just right.
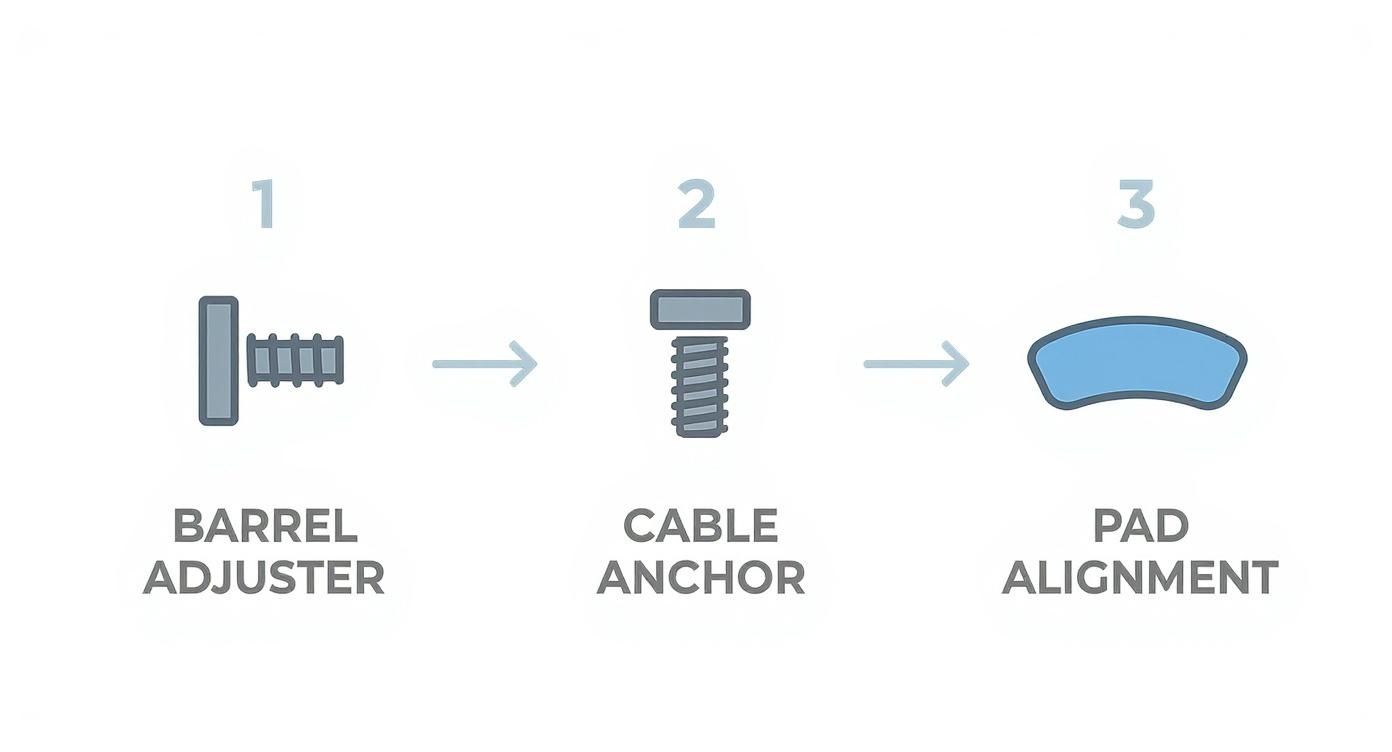
Once you get the hang of the barrel adjuster, cable anchor, and pad alignment, you'll have total control over how your brakes feel and perform.
Setting The Stationary Inner Pad
First things first: forget the brake cable for a minute. Your initial task is to position that inner pad. Take a look at the inside of the brake caliper—the side facing the spokes—and you'll find either a dial or a small Allen bolt. This is your direct control for the stationary pad.
Turn the adjuster clockwise to move the pad toward the rotor. The secret here is to make small adjustments while spinning the wheel. Keep nudging it in until you hear the faintest shing-shing-shing of the pad just kissing the rotor. As soon as you hear it, back the adjuster off a hair—maybe a quarter-turn—until the sound vanishes. You're aiming for the tightest gap possible without any contact.
Workshop Tip: A standard business card works perfectly as a feeler gauge. Slip it between the inner pad and the rotor, adjust the pad until it just snags the card, then back it off a touch. This almost always gets you to the ideal starting point.
With the inner pad perfectly placed, we can now turn our attention to the cable and the moving outer pad.
Adjusting Cable Tension And The Outer Pad
Okay, now it's time to hook up the cable and position that outer pad. Just like with rim brakes, your first move is at the brake lever. Wind the barrel adjuster almost all the way in (clockwise), but leave a turn or two of threads showing. This gives you some room for fine-tuning later on.
Down at the caliper, find the cable anchor bolt on the moving actuator arm. Grab a 5mm Allen key and loosen this bolt just enough for the brake cable to slide through it.
Now, give the end of the cable a firm pull with your fingers or a pair of pliers to take out all the slack. While holding it taut, tighten that anchor bolt back down securely. Give the brake lever a few good squeezes. It should already feel much firmer. If it’s still feeling a bit spongy, just repeat the process, pulling a little more cable through this time.
Your final tweaks are made right at your fingertips using the barrel adjuster on the lever.
- Lever pulling too close to the bar? Turn the barrel adjuster counter-clockwise to tighten the cable.
- Pads rubbing the rotor? Turn the barrel adjuster clockwise to introduce a bit more slack.
The end goal is a firm lever that engages quickly, but allows the wheel to spin freely the moment you let go.
Silencing Rotor Rub Through Caliper Alignment
Sometimes, even after you've set the pads and cable tension perfectly, you still get that infuriating rubbing noise. Nine times out of ten, this means the entire caliper body isn't perfectly centered over the rotor. It’s a super common problem, but thankfully, the fix is incredibly easy.
Find the two larger bolts that mount the caliper to your bike's frame or fork. Loosen both of them just enough that the caliper has some side-to-side wiggle room. Don't take them all the way out.
With the caliper loose, squeeze the brake lever hard and hold it there. This simple action forces the caliper and pads to center themselves perfectly on the rotor. While keeping that firm grip on the lever, carefully tighten the two mounting bolts. Alternate between them, a little bit at a time, to ensure the pressure is even.
Once they're snug, let go of the brake lever and give the wheel a spin. The rub should be gone. A well-aligned brake system with quality pads are some of the best electric bike accessories you can invest in for a safer, quieter, and more enjoyable ride.
Fine-Tuning Hydraulic Brakes for Peak Performance
Hydraulic disc brakes are the gold standard for a reason—they offer incredible stopping power and a smooth, controlled feel with very little effort from your hands. But when we talk about "tightening" them, it's a different ballgame compared to cable-operated brakes. There's no cable to tension. Instead, adjustments are all about ergonomics and precision alignment.
These brakes work using a sealed system of hydraulic fluid. When you pull the lever, fluid pushes pistons in the caliper, clamping the pads onto the rotor. This setup gives you amazing force and modulation, but it can look intimidating. Don't sweat it—the most common tweaks you'll need to make are surprisingly simple and can completely change how your bike feels.
We'll focus on the big three: dialing in the lever position for your hands, aligning the caliper to kill that annoying rubbing sound, and knowing what to do when things feel a little... spongy.
Setting Your Lever Reach for Perfect Control
Your brake levers shouldn't be a stretch. Getting the ergonomics right is a huge deal for both comfort and safety, as it lets you keep a solid grip on the bars while having instant access to your brakes. Luckily, almost all modern hydraulic levers have a reach adjustment built right in.
Take a look near the lever's pivot point. You should spot a small dial or an Allen screw. Playing with this adjuster moves the lever blade closer to or farther away from your handlebar.
- To bring the lever closer: Turn the adjuster screw counter-clockwise.
- To move it farther away: Turn the adjuster screw clockwise.
The goal is to set each lever so you can comfortably hook one or two fingers over the blade without having to shift your hand on the grip. You want your fingers to naturally curve around the end of the lever—that's where you get the most power.
Pro Tip: Don't just set the reach while standing over the bike. Hop on and get into your actual riding position. What feels right in the garage might feel totally different on the trail. Make small adjustments until it feels perfect.
The Easiest Way to Align Your Caliper
That shing-shing-shing sound of a rubbing disc brake is one of the most maddening noises in all of cycling. It’s a dead giveaway that the caliper isn't centered over the rotor, causing a pad to constantly drag. Thankfully, the fix is usually quick and only requires a single tool.
You’ll typically need a 5mm Allen key, though some brakes use a Torx T25 wrench. Find the two main bolts that secure the brake caliper to your bike's frame or fork.
First, loosen both of those mounting bolts just enough for the caliper to have a little side-to-side wiggle room. Don't take them all the way out.
Next, with the caliper loose, squeeze the brake lever for that wheel and hold it down tight. This action uses the brake's own pistons to perfectly center the caliper body over the rotor.
Finally, while still holding that brake lever down firmly, carefully retighten the mounting bolts. I like to alternate between the two, snugging each one down a little at a time. This prevents the caliper from shifting out of place as you secure it.
Let go of the lever, give the wheel a spin, and listen. Nine times out of ten, the rubbing will be gone. If you still hear a faint whisper, you might need to do a tiny manual adjustment by slightly loosening the bolts again and giving the caliper a nudge by hand.
When Your Brakes Feel Spongy
What if you've aligned the caliper perfectly, but the lever still feels soft or pulls all the way to the handlebar? Now you're facing a different beast. A "spongy" lever is the classic symptom of air in the brake lines.
Unlike brake fluid (which doesn't compress), air bubbles do. When you squeeze the lever, that air compresses, robbing you of power and giving you that mushy, ineffective feel.
No amount of mechanical tweaking will fix this. The only solution is a brake bleed, which is the process of forcing all the old fluid and any trapped air out of the system and replacing it with fresh fluid.
While bleeding brakes is a skill you can learn, it requires a specific bleed kit for your brake's brand (Shimano, SRAM, and Magura all have their own) and a bit of patience. For a lot of riders, this is the point where a trip to a good local bike shop is the best move. If you're feeling adventurous, manufacturers provide detailed instructions, and you can often find specific guides by checking the user manuals for your e-bike or components.
Troubleshooting Common Brake Problems

Even after you've dialed in the perfect adjustment, brakes can develop a mind of their own. Unexpected noises, weird vibrations, or a gritty feeling at the lever can pop up, but these are almost always symptoms of a specific, fixable problem. Learning how to read these signs on the fly will save you a ton of frustration and keep your rides safe.
The process of diagnosing and fixing these issues is a skill that translates to other areas. In a way, it’s not unlike troubleshooting common issues and solutions for garage door sensors. You identify the symptom, track down the cause, and test your solution—a logical approach that works for any mechanical system.
Silencing That Annoying Squeal
The most common complaint I hear is that high-pitched squeal that makes everyone around you wince. Nine times out of ten, this noise is from contamination on your brake pads or braking surface. It could be road grime, a bit of chain lube, or even just oil from your fingers.
Your first move should be to give the brake rotor (for disc brakes) or wheel rim (for rim brakes) a thorough wipe-down using isopropyl alcohol and a clean rag. For disc brakes, you can also pull the pads out and lightly scuff their surface with some fine-grit sandpaper to break up any glaze that's formed.
If a good cleaning doesn't solve it, the problem is likely alignment. Check that your disc caliper is perfectly centered over the rotor. For rim brakes, you want to make sure the pads are slightly "toed-in"—meaning the front edge of the pad contacts the rim a split second before the back edge. This simple adjustment prevents the vibration that causes the squeal.
Dealing with Spongy Levers and Uneven Wear
Take a look at your brake pads. If one is wearing down way faster than the other, you have an alignment problem, plain and simple. On a disc brake, it means the caliper isn't centered, so one pad is doing all the heavy lifting. On a rim brake, one pad is sitting closer to the rim. Go back through the alignment steps to get them making even contact.
A gritty or sticky feeling at the lever, especially on mechanical brakes, usually points to a gunked-up cable and housing. Over time, dirt and grime get in there and create friction. Sometimes you can revive it with some lubricant, but the best long-term solution is to just replace the inner cable and the outer housing.
Key Takeaway: Uneven pad wear isn't just a maintenance headache; it's a major performance bottleneck. A misaligned caliper drastically cuts your stopping power because you're only engaging a fraction of the brake's potential.
Knowing When to Call a Pro
Being a good home mechanic also means knowing your limits. Most of these adjustments are pretty straightforward, but a few red flags signal it's time to let a professional take over.
- Hydraulic Fluid Leaks: If you spot any fluid seeping from your levers, hoses, or calipers, stop riding immediately. That's a compromised seal, and a complete brake failure could be next.
- Warped or Damaged Rotors: A slightly bent disc rotor can sometimes be trued, but if it's deeply gouged or worn below the manufacturer's minimum thickness, it's toast. It needs to be replaced.
- Frayed Brake Cables: A single broken strand in a brake cable is a ticking time bomb that can lead to a total snap. If you see any fraying, replace that cable before your next ride.
The market for bicycle brake components is a serious business, valued at around USD 5.9 billion in 2023 and expected to almost double by 2033. This boom is fueled in part by the rise of e-bikes, which put much greater stress on braking systems. This makes getting professional service for critical issues more important than ever.
Got Questions About Your Bike Brakes? We've Got Answers.
Even after you’ve dialed in your brakes, you're bound to have a few questions pop up. Let's tackle some of the most common things riders ask so you can handle issues on the fly and feel truly confident in your work.
How Often Should I Check My Brakes?
There’s no hard-and-fast rule here; it really comes down to how and where you ride. The best habit you can get into is giving the levers a quick squeeze before every single ride. You'll instantly feel if something is off.
For a more in-depth look, once a month is a good schedule for most commuters.
But if you're someone who rides in the rain and mud, or you love bombing down long hills, you're putting a lot more wear on your pads. In that case, you should probably give them a proper check every week or two. The bottom line? The second you feel any sponginess or lag, it’s time to take a look.
Can I Use the Same Tools for All Brake Types?
Not quite. There's definitely some crossover, but each brake system has its own needs. You can get most of the work done on rim brakes and mechanical disc brakes with a good set of metric Allen keys—usually a 4mm and 5mm will be your best friends.
Hydraulic disc brakes are a different beast, though. They need specific gear for their most important job: bleeding the lines. This requires a bleed kit made for your brand of brakes (like Shimano or SRAM), which comes with special syringes, fittings, and the right kind of fluid. You can still adjust the caliper and lever reach with your Allen keys, but you can't touch the hydraulics without that kit.
If you’re building a bike from the ground up, a guide with comprehensive bicycle assembly instructions is invaluable. It’ll walk you through getting everything, including the brakes, set up perfectly right from the start.
Why Are My Brakes Squealing After an Adjustment?
That awful squeal usually isn't about tightness—it’s almost always caused by contamination or vibration. More often than not, some oil, grease, or road grime has found its way onto your brake pads or the braking surface.
Your first move should be to grab some isopropyl alcohol and a clean rag and thoroughly wipe down the braking surface. That means the rim of your wheel for rim brakes, or the metal rotor for disc brakes. For disc brakes, you can also pop the pads out and give them a light scuff with some sandpaper to remove any hardened, glazed-over material.
Pro Tip: If a good cleaning doesn't solve it, the noise is probably a vibration issue from bad alignment. Make sure your disc caliper is dead center over the rotor. For rim brakes, try "toeing in" the pads so the front edge makes contact with the rim a split second before the back edge does.
Here at eBike Gang, LLC, we know that a well-maintained bike is an absolute joy to ride. Whether you're dialing in your UGBEST MB750 for cruising city streets or getting your VETRA BLAZER ready for the trail, our bikes are built for riders who demand performance and control. Check out our full lineup and find the perfect ride for your next adventure.