

So you want to crank up the speed on your e-bike? I get it. The thrill of going faster is a big part of the fun. The good news is, you can definitely make your e-bike faster through a combination of software tweaks, hardware upgrades, and a few smart mechanical adjustments.
We're talking about everything from unlocking the software speed limiter to swapping in a higher voltage battery and controller, and even fine-tuning things like tires and gearing for maximum efficiency.
Hold On—Know the Rules Before You Chase Speed

Before you even think about grabbing a wrench or plugging in a cable, we need to have a serious talk about the legal and safety side of things. Pushing your bike beyond its factory settings comes with real responsibilities, and this is the pre-flight check you can't afford to skip.
Manufacturers don't put speed limiters on e-bikes just for fun; they're designed to comply with specific regulations that keep everyone safe on roads and trails. Flying past these limits can get you into hot water, from hefty fines to having your bike confiscated.
What E-Bike "Class" Really Means
The entire legal framework for e-bikes is built on a classification system. While the rules can differ slightly from place to place, most of the U.S. uses a three-tier system to define what an e-bike is and where you can ride it.
- Class 1: These are pedal-assist only. The motor kicks in to help you while you're pedaling, but it cuts out at 20 mph.
- Class 2: These bikes come with a throttle, meaning you don't have to pedal for the motor to work. They are also capped at 20 mph. You can learn more in our detailed breakdown of the Class 2 ebike category.
- Class 3: Often called "speed pedelecs," these are also pedal-assist only but will help you all the way up to 28 mph.
These classes determine where you can legally ride, whether you need a helmet, and more. If you modify your Class 2 e-bike to hit 35 mph, you've essentially created an unlicensed motor vehicle in the eyes of the law.
Local Laws Are a Big Deal
The state-level classifications are just the beginning. Your local city, county, or even the park district down the street will have its own set of rules. A Class 3 e-bike might be perfectly fine on a city bike lane but completely banned from a shared-use path right next to it.
Before you modify anything, do your homework on local laws. It's eye-opening to see how seriously speed is treated. For example, looking at something like Florida's Super Speeder Law shows how different speed thresholds can trigger major penalties, even for cars. It’s a good reminder that speed limits matter.
Speed vs. Longevity: The Big Trade-Off
Let's be clear: every modification is a compromise. Pushing more power through your e-bike’s system puts extra strain on the motor, controller, battery, and drivetrain. You'll also see your range drop, sometimes significantly.
The smartest approach is a balanced one. You want more performance, but not at the cost of reliability or safety. Starting with a solid, well-built platform gives you a great foundation for responsible tuning and upgrading. When you understand these trade-offs, you can make smarter choices that truly improve your ride without creating a bunch of new problems.
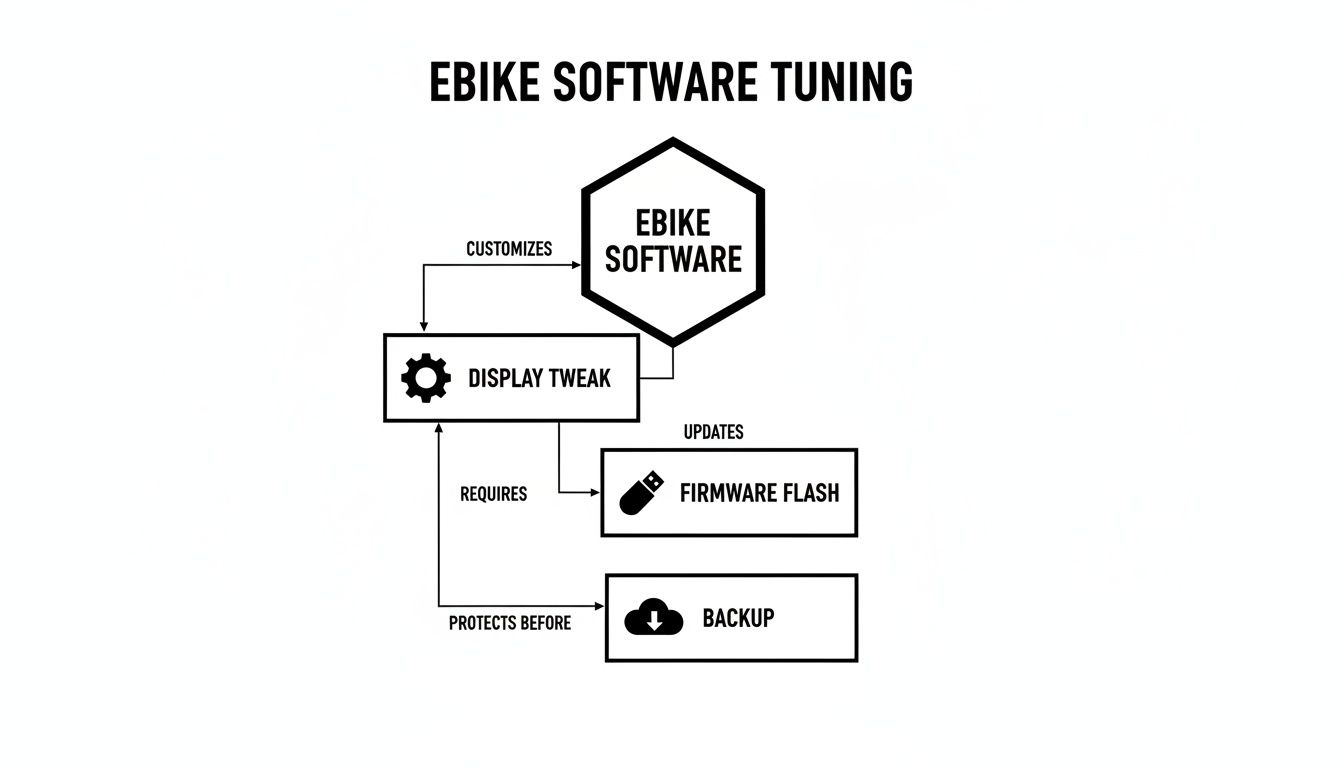
Unlock Hidden Speed Through Software Tuning
Believe it or not, the quickest way to make your ebike faster often doesn't involve a single wrench. The first real speed boost is usually hidden in the software. Most electric bikes are shipped from the factory with a speed limiter to comply with local laws, but that doesn't always mean it's set in stone.
This is the perfect place to start your tuning journey because it's non-invasive and, in many cases, completely reversible. For a commuter just trying to keep up with traffic, a simple digital tweak can make a world of difference. Let's look at how you can safely tap into that extra performance.
Start with Your Ebike's Display Settings
The easiest win is right there on your handlebars—your ebike's display. Manufacturers often tuck away advanced settings behind a password or a specific sequence of button presses to keep riders from changing things by accident. Your mission is to find the menu that governs the bike’s top speed.
Your best bet is to do a quick online search for your specific model, like "UGBEST MB750 advanced settings," which will almost always lead you to a forum or YouTube video with the instructions. Once you're in that hidden menu, you can typically bump the speed limit up from the standard 20 or 28 mph.
- Find the "Key": Search online forums or YouTube for your bike model to find the access code or button combination.
- Navigate with Care: Look for terms like "Speed Limit," "Top Speed," or "Max Speed" in the settings.
- Go Slow: Don't just crank it to the maximum setting right away. Nudge the limit up by 2-3 mph at a time, then go for a test ride. This helps you get a feel for the new handling and avoids putting too much stress on the bike's components.
Keep in mind this tweak almost exclusively impacts your pedal assist system and how it behaves at higher speeds. If you want to get a better handle on how these systems operate, our guide on what pedal assist is on an ebike breaks down the tech in detail.
A Deeper Dive: Firmware Flashing
If your display settings are locked down or you’ve maxed them out and still want more, the next level is firmware flashing. This is a much more hands-on process where you connect your ebike’s controller to a computer and overwrite the factory software with a custom or open-source version.
This is definitely an advanced move, but the rewards can be significant. Custom firmware can unlock not just a higher top speed but also snappier acceleration and smoother, more predictable power delivery.
But tread very carefully here. Flashing the wrong firmware or having the process fail halfway through can "brick" your controller, turning it into a very expensive paperweight. The golden rule is to always back up your original firmware before you touch anything. That backup is your lifeline if something goes sideways.
Crucial Takeaway: Think of firmware flashing like ECU tuning a car. It unlocks a ton of performance potential but comes with real risk. A single mistake could mean costly repairs, and it's a surefire way to void your warranty.
Comparing Software Tuning Methods
So, should you stick to a simple display tweak or dive into a full firmware flash? It really boils down to your technical skill and how much risk you're willing to take.
Here’s a quick breakdown to help you decide which path makes the most sense for you.
| Tuning Method | Difficulty | Cost | Potential Speed Gain | Risk Level |
|---|---|---|---|---|
| Display Settings Tweak | Low | Free | +2 to 5 mph | Very Low |
| Firmware Flashing | High | Free (Software) | +5 to 10+ mph | High |
| Mobile App Tuning | Low-Medium | App-dependent | Varies by brand | Low |
For the vast majority of riders, tweaking the display settings is the ideal starting point. It delivers a noticeable speed bump with almost no risk, letting you feel the difference without getting your hands dirty. If you hit a wall with that method, then it’s time to start doing some serious research on firmware options that are compatible with your specific motor and controller.
Upgrade Your Battery, Controller, and Motor
When you’ve pushed the software as far as it can go, it’s time to roll up your sleeves and get into the hardware. This is where the real magic happens, fundamentally changing your bike's acceleration and how fast it can really go. We're talking about the "power trio" of your ebike’s electrical system: the battery, the controller, and the motor.
Think of these three components as a tightly-knit team. A bigger motor is just dead weight without a controller that can feed it enough power. And neither can do their job if the battery can't supply the voltage and amps they're demanding. To genuinely unlock more speed, you have to upgrade them in harmony.
More Voltage Equals More Speed
Honestly, the single most effective way to raise your ebike's top speed is to increase the system voltage. Voltage acts a lot like water pressure—the higher it is, the faster the electrons flow. For your motor, this directly translates into a higher RPM (Revolutions Per Minute).
A common and seriously effective upgrade is jumping from a standard 48V battery to a 52V battery. It might not sound like a huge leap, but that small change can give you a very noticeable boost in top-end speed. It’s a popular first hardware mod for riders who want a real performance kick without tearing the whole bike apart.
The flowchart below gives a good overview of the software side of things, which is often the first step before you start swapping out major hardware.
While display tweaks and firmware flashes are great for getting your feet wet, upgrading your battery and controller is what truly unlocks the next level of power.
The Controller: Your Ebike's Brain
Your ebike's controller is the gatekeeper. It dictates how much power flows from the battery to the motor when you hit the throttle or start pedaling. A stock controller is perfectly matched to the factory components, but it immediately becomes a bottleneck the second you hook up a higher-voltage battery.
Imagine trying to suck a thick milkshake through a tiny coffee straw. That's exactly what happens when you pair a powerful battery with an under-specced controller. To unleash the full potential of that new battery, you must install a controller that can handle the increased voltage and amperage. A high-amperage controller lets more current flow, which gives you that snappy acceleration and serious hill-climbing torque you're after.
Pro Tip: When shopping for a new controller, look for one rated for a voltage range that covers both your old and new battery. This gives you some wiggle room and, more importantly, keeps your components from frying. Never, ever run a higher voltage battery through a controller that isn't rated for it.
Matching the Motor to Your Mission
Finally, let's talk about the motor itself. Your stock motor can probably handle a modest voltage bump, but if you're planning a major power upgrade, you'll eventually need a motor to match. This is where you need to decide what kind of performance you really want.
- Powerful Hub Motors: These are fantastic for raw speed on pavement. They're simpler, generally more affordable, and can deliver incredible top-end performance. Perfect for a street build.
- High-Torque Mid-Drives: These motors are mounted right at the crankset, meaning they use your bike's own gears. This gives them superior torque for climbing ridiculously steep hills and handling aggressive off-road trails.
This synergy between components is what's pushing the industry forward, with lithium-ion tech enabling some seriously fast bikes. The speed pedelec market, which is projected to hit USD 2.24 billion by 2029, is proof of this trend. It's all fueled by high-capacity batteries that allow speeds of 28 mph and beyond.
For certain models, upgrading from a 48V to a 52V system can boost power delivery by 25%, pushing speeds well over 35 mph.
Before you start a full system overhaul, make sure you have a solid grasp of the electrical principles at play. If you're someone who enjoys the hands-on process, our guide on building an ebike from scratch offers some great foundational knowledge. Getting these upgrades right will deliver the thrill you're looking for, but it takes careful planning to make sure everything works together safely and reliably.
Fine-Tune Performance with Mechanical Mods
Once you've pushed the electronics as far as they can go, it's time to get your hands dirty with the mechanical side of things. Raw power from the motor is only half the battle. How that power actually gets to the pavement is what separates a fast bike from a truly high-performance machine.
Think of it like this: a powerful engine is useless without the right transmission and tires. These physical, hands-on adjustments are where you'll find the gains that make a real-world difference, ensuring none of that electrical grunt goes to waste.
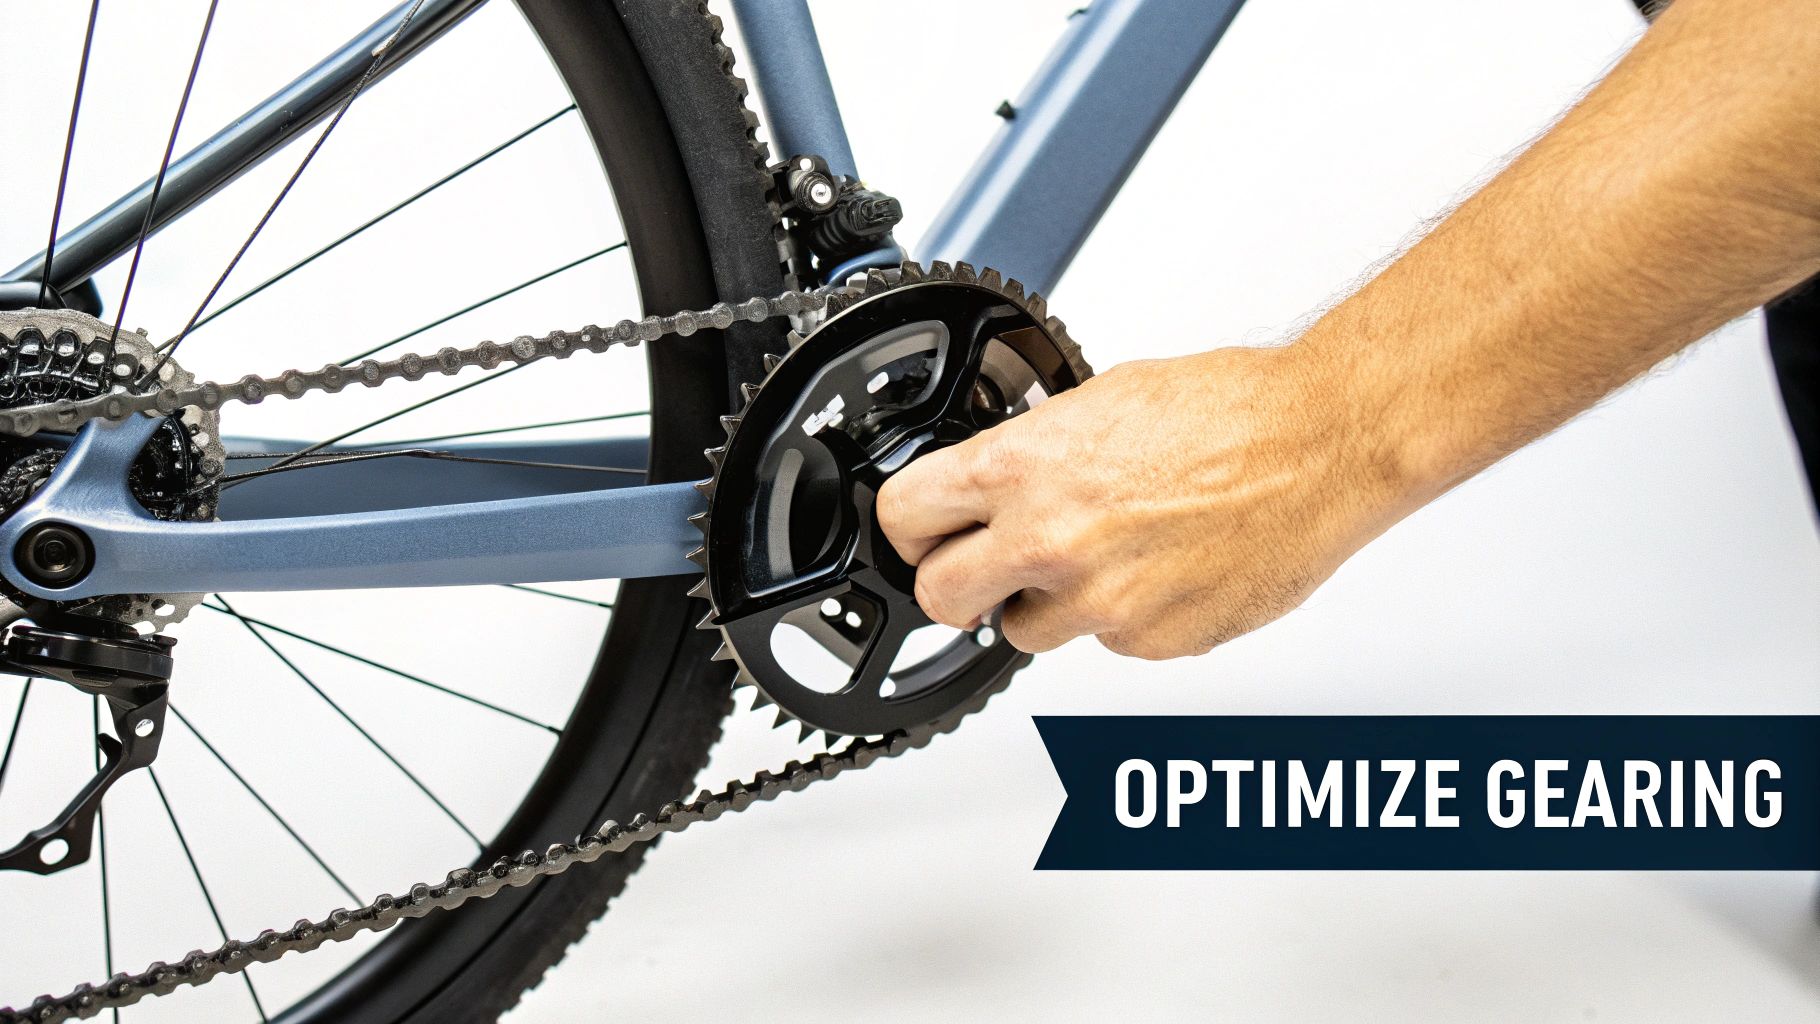
Master Your Gearing for Higher Speeds
You know that frustrating feeling when you're flying along, but your legs are spinning like crazy and you can't pedal any faster? That's called "ghost pedaling," and it’s a dead giveaway that your gearing is the bottleneck. Your motor has more to give, but your legs simply can't keep up with the cadence.
The fix is all in the gear ratio. By swapping out your front chainring or rear cassette, you can completely change your bike's high-speed personality.
- Install a Larger Front Chainring: This is the most common and effective route to a higher top speed. Going from a stock 44-tooth chainring to a 52-tooth one, for instance, gives you a much "taller" gear. Every rotation of the pedals turns the wheel more, letting you apply meaningful power at speeds that were previously out of reach.
- Change the Rear Cassette: If a bigger chainring won't fit your frame, you can achieve a similar effect at the back. Swapping a cassette that bottoms out at an 11-tooth cog for one with a 10-tooth cog will also give you a bit more top end. It’s a more subtle change, but sometimes it's all you need.
This is a brilliant upgrade because it lets your human power work with the motor at higher speeds, not against it.
Unlock Free Speed with the Right Tires
Tires are probably the single most underrated component when it comes to speed. The difference in rolling resistance between a chunky off-road tire and a slick road tire is massive. This is where you find what many of us call "free speed."
Rolling resistance is essentially the energy your bike loses just from the tires squishing against the pavement. Less resistance means less wasted energy.
- Pick the Right Tread: If you're riding on pavement, ditch the knobby mountain bike tires. Switching to a slick or semi-slick tire with minimal tread will drastically cut down on friction and noise.
- Pump Them Up: This is the easiest performance tweak in the book. Inflate your tires to the higher end of the PSI range printed on the sidewall. A firm tire deforms less, rolls faster, and makes the bike feel instantly more responsive.
Your tires are your only connection to the road. A simple swap to a more efficient set can feel like you've added more power to the motor, especially when cruising at a steady speed. It's often the most cost-effective speed upgrade you can make.
Shed Weight and Reduce Drag
Finally, let’s talk about the two invisible forces you’re always fighting: weight and wind. Every ounce you can shed and every bit of drag you can reduce makes a difference.
Improvements here can be surprisingly effective, boosting efficiency by 15-20% in some cases. It's why the e-bike drive unit market, which is projected to grow from USD 4.68 billion in 2024 to USD 8.49 billion by 2034, is so focused on lightweight materials like carbon fiber. In fact, you can find a full industry analysis on gminsights.com that explores these trends.
For a bike like the VETRA BLAZER, shedding just 5-10 lbs with aftermarket parts can add a noticeable 3-5 mph to its top speed on the trail.
Start simple. Remove any unnecessary accessories for your speed runs—heavy racks, baskets, or that massive U-lock. Also, think about your body position. Tucking in and lowering your profile reduces the wall of air you have to push through, which makes a huge difference, especially at higher speeds.
Test Your Upgrades Safely and Responsibly
Alright, you’ve put in the work. The new controller is installed, the battery is locked in, and you’ve dialed in the mechanics. Now for the most critical part of your mission to make your e-bike faster: testing everything safely. This is the moment of truth where you confirm your mods work, catch any hidden issues, and make sure your souped-up ride is a thrill, not a hazard.
Skipping this step is just asking for trouble. Higher speeds put a ton more stress on every single component, from the frame welds right down to the brake pads. A loose bolt that was just a minor rattle at 20 mph can become a catastrophic failure at 35 mph. A systematic, safety-first approach isn't just a good idea—it's non-negotiable.
Your Post-Modification Safety Checklist
Before your tires even hit the pavement, it’s time for a full-on pre-flight inspection. Go over your bike with a fine-tooth comb and a fresh set of eyes. Put on your mechanic hat and double-check not just the parts you upgraded, but everything they connect to.
This isn't just about making sure the bike runs; it's about making sure it won't fall apart when you're pushing its new limits.
- Torque Check Everything: Grab a torque wrench and go over every single bolt you touched, and even a few you didn’t. Pay close attention to motor mounts, axle nuts, stem bolts, and especially your brake calipers. High-speed vibrations can work things loose in ways you wouldn't expect.
- Inspect Your Brakes: Sure, your old brakes were fine for 20 mph, but can they handle stopping a heavier, faster bike? Check your brake pads for wear. If you’ve made some serious power upgrades, you should seriously consider upgrading to larger rotors or full hydraulic brakes.
- Secure All Wires: Make sure every new electrical connection is tight, secure, and shielded from the weather. Use plenty of zip ties to keep wires from snagging on anything or rubbing against the frame. A short circuit at speed is a genuine fire risk.
The First Test Ride Protocol
Your first ride on the modified bike should be a shakedown run, not a speed trial. The entire goal here is to listen, feel, and observe how the new hardware is behaving under a light load. Find a big, empty parking lot or a quiet street with zero traffic where you can test things out without any risk.
For this ride, you’re a test pilot. Your senses are the best diagnostic tools you have.
Listen for any new or weird sounds. A clicking noise could be a loose connection, while a grinding sound might point to a problem with the motor or drivetrain. Feel for any strange vibrations or wobbles, which could indicate a wheel alignment issue or a component that isn't secure. Start slow, gently testing the acceleration and braking at low speeds before you even think about pushing it.
Key Insight: Your first test ride isn't about hitting top speed. It's about ensuring a safe return. Gradually increase speed and braking force, listening for any protests from the new hardware. This methodical approach will reveal issues before they become dangerous.
Revisit the Legal and Warranty Implications
Okay, so you've confirmed the bike is mechanically sound. Now it's time to circle back to the real-world consequences. A faster e-bike can easily cross the legal line from being a "bicycle" to a "moped" or even a "motorcycle." That reclassification could mean you suddenly need a license, registration, and insurance in your area. Ignorance of the law won't get you out of a ticket, so do yourself a favor and confirm your local regulations.
Here at eBike Gang, we love seeing the community push the limits, but we also have to be crystal clear about our 12-month limited warranty. Making significant electrical modifications—like swapping out the controller or battery—will likely affect your coverage because it alters the bike from its factory-certified state.
Upgrading to a high-performance motor can dramatically boost your e-bike's speed, turning a standard commuter into a speed demon. Take speed pedelecs, which are engineered for higher velocities—reaching up to 28 mph with 500W power motors that have skyrocketed in popularity across Europe, where they snagged a dominant 36% market share in 2024. This mod not only amps performance but aligns with the 12.8% CAGR in the broader USD 121.4 billion e-bike market by 2034, making your ride safer—78.3% of users feel secure versus 63.7% on regular bikes. You can learn more about the rise of speed pedelecs on precedenceresearch.com.
By testing responsibly, you protect your investment, your warranty (where it still applies), and most importantly, yourself. A bike that is both wildly fun and rock-solid reliable is the ultimate prize.
Common Questions About Ebike Speed Upgrades
Once you start thinking about making your ebike faster, the questions come thick and fast. It's totally normal to wonder what these changes actually mean for your bike and your daily rides. Let's break down some of the most common questions I hear with some straight, no-nonsense answers.
Will Making My Ebike Faster Drain the Battery Quicker?
Yes, without a doubt. Think of this as the number one trade-off. Pushing for a higher top speed asks a lot more from your battery, and your range will take a hit. Every time.
It's not a simple one-to-one relationship, either—it's exponential. The faster you go, the more wind resistance you have to fight, forcing your motor to work overtime. Cruising at 28 mph instead of 20 mph can easily chew through your range, sometimes cutting it by 30-50%, depending on the terrain and how hard you're pushing. This is why a lot of riders who go for speed also end up investing in a battery with a higher Amp-hour (Ah) rating to get some of that lost range back.
What Is the Single Most Effective Upgrade for More Speed?
If you're looking for the biggest, most direct impact on your top speed, nothing beats upgrading to a higher voltage battery. Bumping your system from a standard 48V up to a 52V or even a 72V setup literally makes the motor spin faster. More spin equals more speed. It’s that simple.
But—and this is a big but—you can't just slap a new battery on and call it a day. A higher voltage battery must be paired with a controller built to handle that extra juice.
A higher voltage battery is your ticket to a higher top speed, but only if you have a compatible, high-amperage controller to manage the power. Trying to run a 52V battery on a stock 48V controller is a surefire recipe for a fried, useless piece of electronics. The best upgrade is always a matched system.
Does Increasing My Ebike's Speed Void the Warranty?
In almost every scenario, yes. The moment you start modifying core electrical components like the motor, controller, or battery, you can pretty much kiss your manufacturer’s warranty goodbye. You're fundamentally changing the bike from its factory-certified state, putting stress on the frame, brakes, and other parts that they were never designed to handle.
Here at eBike Gang, our 12-month limited warranty is there to cover manufacturing defects on the bike as we sold it. Any performance modifications you make fall outside that coverage. Swapping out tires or grips is usually fine, but it’s always smart to double-check your warranty terms before touching anything related to the powertrain.
Are There Legal Risks to Making My Ebike Faster?
Absolutely, and they can be serious. Ebikes are legally sorted into classes (Class 1, 2, 3) that have specific speed limits—typically 20 mph for Class 1/2 and 28 mph for Class 3. Once you modify your bike to blow past those limits, you risk having it legally reclassified as an unlicensed motor vehicle, like a moped or motorcycle.
That opens up a whole new can of worms. Suddenly, you might need a driver's license, vehicle registration, and insurance just to ride it. Getting caught on an illegally modified ebike can lead to:
- Steep fines
- Confiscation of your bike
- Other legal headaches
Regulations vary everywhere. Public roads, bike paths, and trails all have different rules. It's 100% your responsibility to know and follow the federal, state, and local laws where you ride. Private property is usually the only place you can really let loose without worrying about these rules.
Of course, not every upgrade is about raw power. Many riders find joy in personalizing their setup with gear. If you're looking for ideas, you can find some unique gifts for cyclists that improve the ride without touching the bike's legal status, from clever gadgets to comfortable apparel.
Ready to start your electric adventure with a bike built for performance right out of the box? Explore the full lineup of powerful and reliable electric bikes at eBike Gang. Find your perfect ride today at ebikegang.com.