

Navigating the world of bicycle tire valve stems can seem a little confusing at first, but it really just comes down to three main players: Presta, Schrader, and Dunlop. Think of each one as a specific type of gatekeeper, letting air into your tire in its own unique way. They're all designed for different kinds of bikes and wheels, so figuring out which one you have is the first step to easy inflation and hassle-free rides.
Why Your Bike Has a Specific Valve Type
It’s easy to overlook a valve stem as just a simple air nozzle, but it’s actually an engineered component chosen specifically for your bike's intended use. Whether you're flying down the road on a high-performance carbon frame, tackling a rugged mountain trail, or just cruising around town, that little valve was selected to optimize performance, durability, and air pressure.
This choice affects everything from the structural integrity of your wheel's rim to how quickly and easily you can top off your tires before a ride. It might seem like a small detail, but the market for these parts is huge. The global bicycle valves market is on track to hit USD 350 million by 2025, and it’s estimated that around 300 million Presta and Schrader valves were fitted that year alone. It just goes to show how essential these components are to the cycling experience.
What This Guide Covers
This guide is here to clear up the confusion around bicycle tire valves once and for all. By the time you're done, you'll be able to handle any inflation or maintenance task like a pro.
We’re going to cover:
- The Big Three: We'll dive deep into Presta, Schrader, and Dunlop valves, breaking down how each one works and where you're most likely to find it.
- Bike and Rim Compatibility: You'll learn why a skinny road bike rim requires a totally different valve than a wide, beefy mountain bike rim.
- Pumps and Adapters: We'll show you how to match the right pump to your valve and become a master of using adapters for maximum flexibility.
- Troubleshooting Tips: Get quick fixes for common headaches like slow leaks and stubborn valve cores—the kind of practical knowledge that belongs in any good cycle maintenance kit.
By the end, you'll be able to spot each valve type from a mile away and, more importantly, understand the "why" behind their design. This is the kind of know-how that empowers you to pick the right tubes, use any pump with confidence, and keep your tires perfectly inflated for every single ride.
The Three Main Valve Types Explained
At first glance, the world of bike tire valves might seem a little confusing. But really, it all boils down to three main types you’ll run into. Think of them as different gateways for air, each with a specific job. Once you know them, you'll understand why your bike has the ones it does and how to keep your tires properly pumped up.
The valve on your bike isn't just a random part; it's an intentional choice by the manufacturer, dictated by what the bike is built for—whether that's high-speed road racing or bashing down a rocky trail.
This diagram gives you a quick visual of the big three.
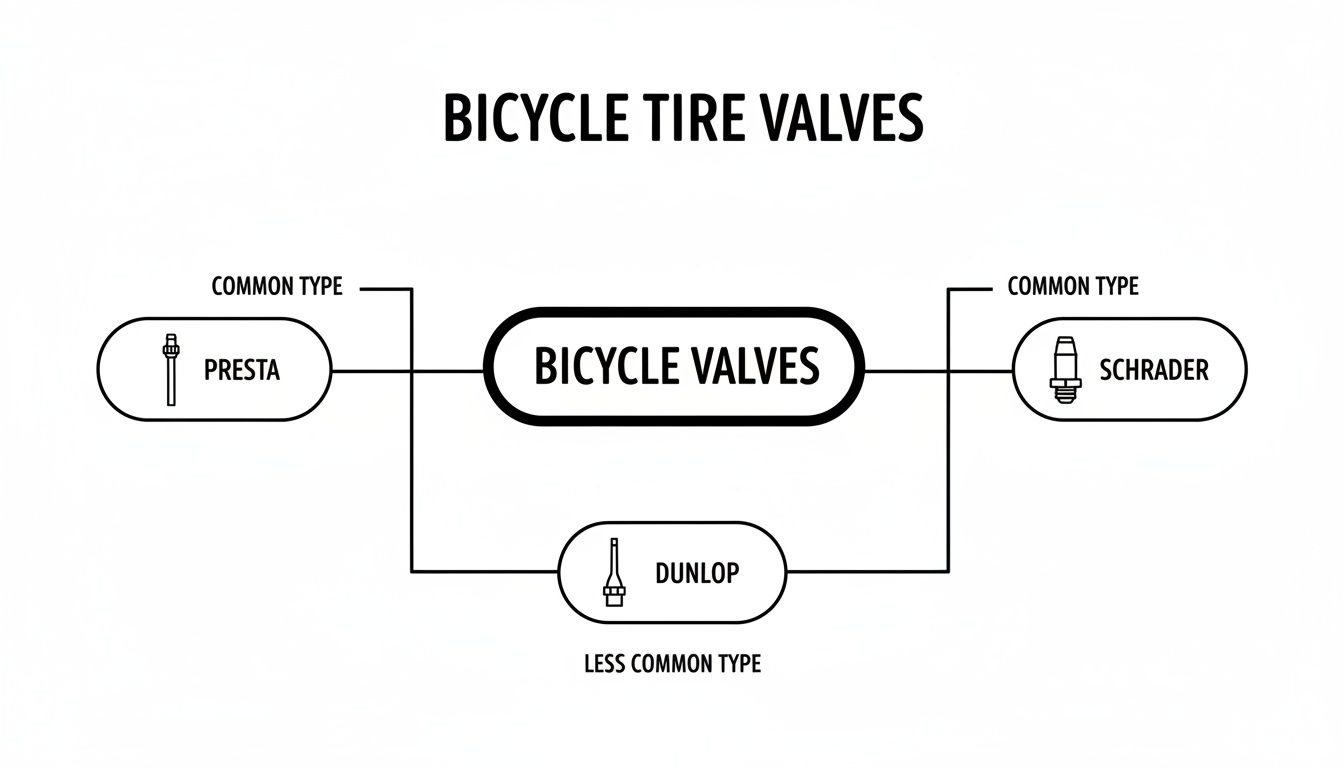
As you can see, each one has a pretty distinct look, making them easy to tell apart once you know the basics.
Schrader: The Familiar Standard
If one of these looks familiar, it’s probably the Schrader valve. It’s the same kind you'll find on every car tire. Just look for the short, wide metal tube with a spring-loaded pin right in the center. To add or release air, all you have to do is press that pin.
Its tough, no-nonsense design makes it the default choice for bikes where durability is more important than shaving off every last gram. That's why you’ll see Schrader valves on:
- Mountain bikes
- Hybrid and commuter bikes
- Cruisers and kids' bikes
- Many electric bikes and dirt bikes
They are incredibly common, used on an estimated 90% of all hybrid and city bikes. It's not just bikes, either; the broader market for these rubber valve stems is massive, projected to grow from USD 850 million in 2024 to USD 1.7 billion by 2034. You can discover more insights about the rubber valve stem market to see just how essential these little parts are.
Presta: The Performance Choice
Next up is the Presta valve. This is the skinny, more elegant-looking one that’s a favorite in the world of high-performance cycling. It's different from a Schrader because it doesn't have a spring-loaded pin. Instead, you'll see a small locknut at the tip that you have to unscrew by hand before you can inflate the tire.
It might seem a bit fussy, but that design is genius for high-pressure applications like skinny road bike tires.
The real magic of the Presta valve is that it uses the tire's own internal air pressure to create a super-tight seal. The more pressure you pump in, the more secure the seal gets, making it perfect for pressures well over 100 PSI.
This is exactly why you'll find Presta valves on:
- Road racing bikes
- Gravel bikes
- High-end mountain bikes (especially for tubeless setups)
Their slim diameter also means they only need a small hole in the wheel rim, which helps keep lightweight, narrow rims stronger. After WWII, this valve took off in Europe, becoming the standard on over 70% of touring bikes by the 1970s.
Dunlop: The European Hybrid
Last, and least common in the US, is the Dunlop valve (sometimes called a Woods valve). The easiest way to think of it is as a sort of hybrid. It has a wide base like a Schrader, so it fits in the same size rim hole, but you inflate it like a simplified Presta.
With a Dunlop valve, you don't have to unscrew anything. You just pop a Presta-compatible pump head on and go. It’s simple and very reliable, though its one downside is that you can't easily check the pressure with a standard gauge.
While you won’t see them much in North America, Dunlop valves are still all over city and utility bikes across Europe and Asia. They're a classic, dependable design that just works—a practical choice for everyday riding.
Matching the Right Valve to Your Bike and Rim
Picking the right valve for your bike isn’t just about personal preference; it's a decision dictated by good old-fashioned physics and engineering. You can't just slap any valve on any bike, and the reason boils down to the critical relationship between your wheel rim, the pressure inside your tire, and how the valve is built.
Think of your wheel rim for a second. It has to be an incredibly strong, yet delicate, structure. Every single hole drilled into it—including the one for the valve stem—creates a potential weak spot. This is where the real-world difference between a Presta and a Schrader valve truly comes into play.
Rim Strength and Pressure Demands
Let's look at a high-performance road bike. Those rims are narrow and light, designed to slice through the air with minimal drag. A big, clunky hole would seriously compromise the rim's structural integrity, especially when you're pumping tires up to 100 PSI or more.
This is exactly why Presta valves are the gold standard in the road cycling world.
- Narrow Profile: At just 6mm wide, a Presta valve needs a much smaller hole. This simple fact leaves more metal in the rim, preserving its strength right where you need it most.
- High-Pressure Sealing: The design is clever—it actually uses the air pressure inside the tube to press the valve shut, creating a tighter and more reliable seal as pressure increases.
On the other hand, you have mountain bikes, cruisers, and a lot of e-bikes. Their rims are wider, beefier, and built more for durability than aerodynamics. These bikes run much lower tire pressures, often in the 30-60 PSI range, and are designed to soak up bumps, not win a time trial. For these wheels, an 8mm Schrader valve hole isn't a structural risk at all. In fact, the Schrader's rugged, spring-loaded design is a real plus when you're bouncing around on the trail.
The Tubeless Factor and Valve Cores
With tubeless tires becoming the norm for mountain and gravel bikes, valve choice is more important than ever. Tubeless setups rely on a liquid sealant inside the tire to plug punctures as they happen. This is an area where the Presta valve really pulls ahead.
The secret is the removable core. Most Presta valves let you unscrew the tiny inner mechanism with a simple tool, opening up a wide, direct channel into the tire. This makes injecting sealant with a syringe an absolute breeze. Without it, you’d be fighting to get the sealant in or, worse, having to unseat the tire bead—a messy, frustrating job nobody enjoys.
Pro Tip: While you can find some Schrader valves with removable cores, it's a standard, expected feature on almost any tubeless-ready Presta valve. This one feature is a huge reason why even high-end mountain bikes with wide rims often come drilled for Presta.
Solving Compatibility Issues
So, what do you do if your rim is drilled for a wide Schrader valve but the only tube you have has a skinny Presta valve? It’ll fit, sure, but it will be loose, wobbly, and unstable. The sharp metal edges of the oversized rim hole can easily slice into the valve stem at its base, causing a flat that’s impossible to patch.
Thankfully, there's an easy fix: a small, cheap part called a rim grommet or valve hole adapter. This little insert pops into the Schrader-sized hole, snugly filling the gap and giving your Presta valve a secure, stable home. It’s a simple trick that stops rattling and protects your tube from damage.
Just remember, you can’t go the other way. A rim drilled for a 6mm Presta is simply too small to force an 8mm Schrader valve through. That's why making sure your valve type matches your rim's drilling is the golden rule of wheel and tire maintenance.
Mastering Inflation with Pumps and Adapters
Knowing your bicycle tire valve stem types is only half the battle. The real test comes when you actually need to pump up a tire, and a pump that doesn't fit can stop a great ride in its tracks.
Thankfully, you don't need a different pump for every bike. Most quality floor pumps and many portable ones are built for versatility, featuring a dual-head or smart-head design. A dual-head has two distinct openings—the big one for Schrader and the small one for Presta. A smart-head is even simpler, with a single opening that automatically adjusts to whatever valve you press it onto.
A Step-By-Step Inflation Guide
Getting air into your tires is a fundamental skill, but the process has a few subtle differences depending on your valve.
For a Schrader Valve:
- Unscrew and remove the plastic dust cap.
- Press the pump head firmly onto the valve until it’s seated.
- Flip the lever on the pump head up to lock it on.
- Pump away until you hit the recommended PSI printed on your tire’s sidewall.
- Quickly unlock the lever and pull the pump head straight off.
For a Presta Valve:
- Take off the plastic dust cap.
- Unscrew the tiny locknut at the tip of the valve. Keep going until it stops—don't try to remove it completely!
- Give the tip a quick tap to release a little puff of air. This "burping" step is crucial to make sure the valve isn't stuck closed.
- Press the pump head on, lock the lever, and inflate.
- After removing the pump, remember to gently tighten the locknut with your fingers.
A common rookie mistake is cranking down on the Presta locknut. It only needs to be finger-tight to seal. Overtightening can easily damage the delicate valve stem.
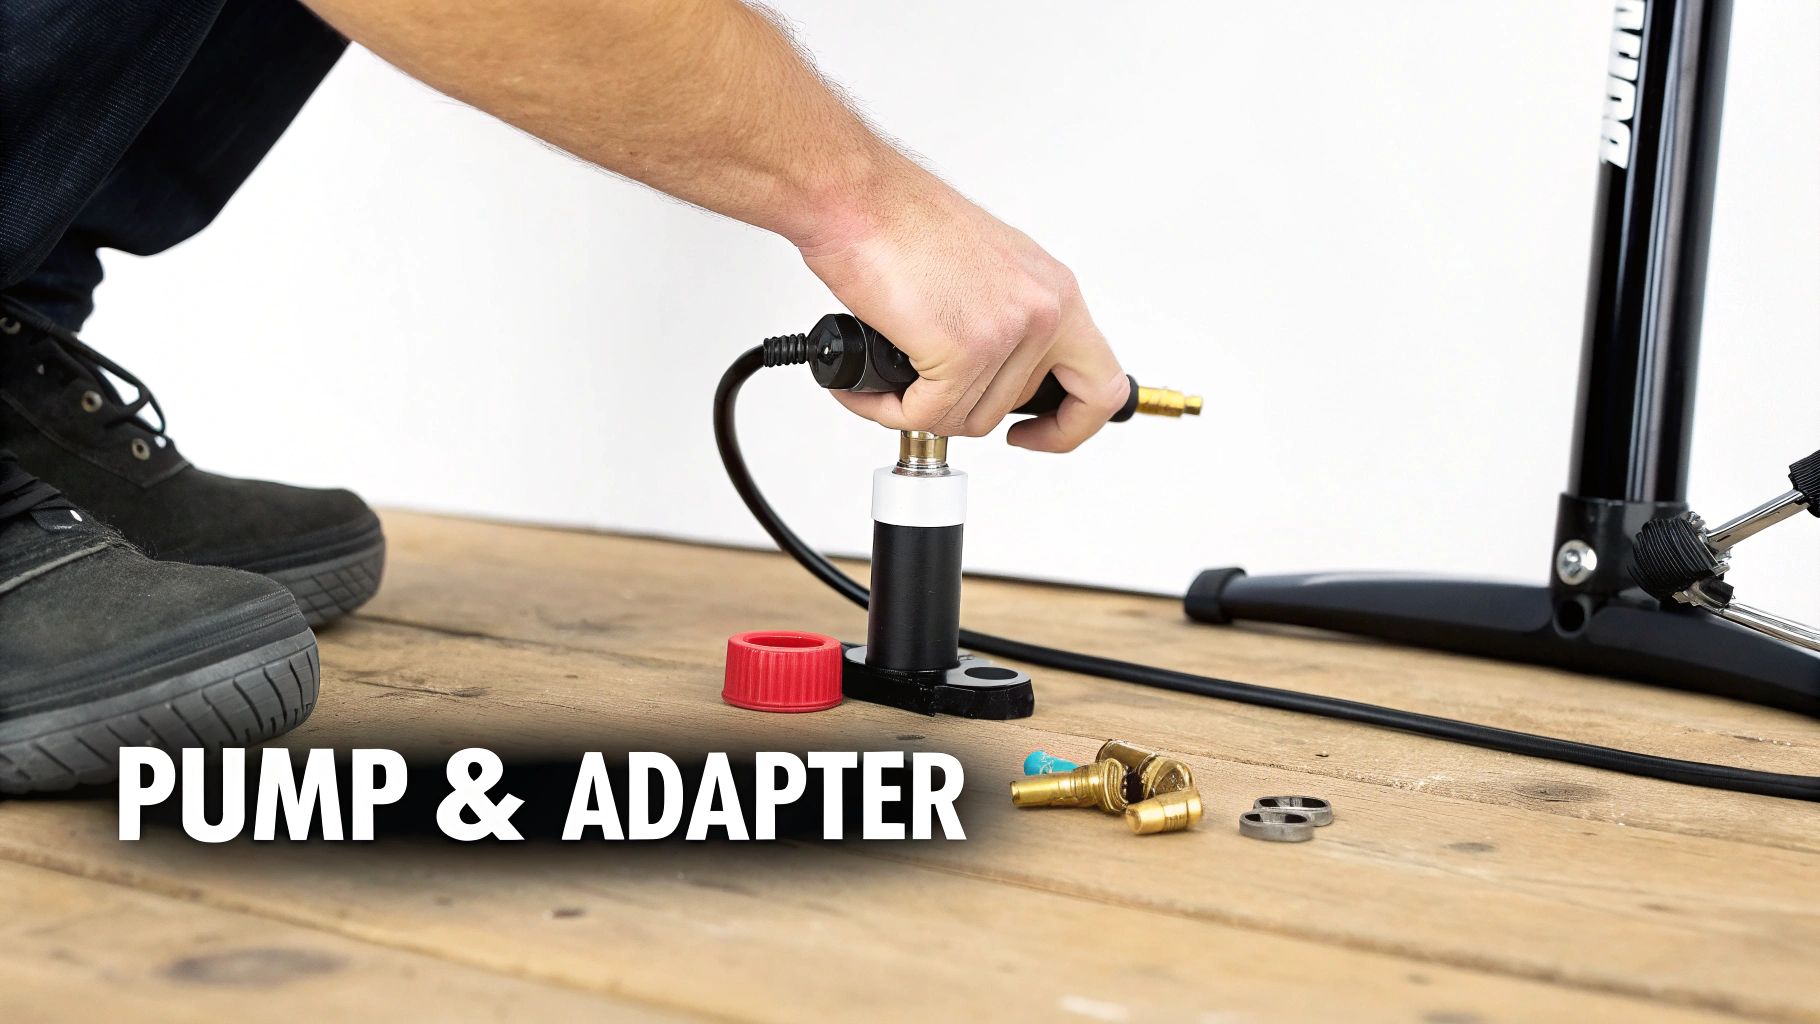
The Power of the Valve Adapter
So, what happens when you get a flat on your road bike and the only air source for miles is a gas station compressor? This is where a tiny, cheap tool becomes a lifesaver: the Presta-to-Schrader adapter.
This little brass fitting just screws onto the tip of an open Presta valve, instantly converting it into a Schrader valve that any standard pump can use. It's an essential piece of kit for every cyclist's tool bag.
But a word of caution is needed when using a gas station compressor.
- Use Short Bursts: Those machines are built for massive car tires and can blast a bike tire into oblivion in seconds. Inflate with very short, controlled bursts of air.
- Check Pressure Frequently: Hit it with air for just a second, then stop and check the pressure with a gauge. Repeat this process until you’re at the right PSI.
Carrying a valve adapter is a no-brainer. But for truly reliable inflation anywhere, nothing beats having a high-quality portable air pump for bikes that gives you total control, no matter where the trail takes you.
Troubleshooting Common Valve Problems
Even the most reliable valve stem can cause a headache every now and then. Nothing's worse than discovering a slow leak or a stuck valve core mid-ride, but don't sweat it. Most of these issues are surprisingly easy to fix right on the trail or in your garage.
More often than not, if you're losing air, the problem is right at the valve core. A loose or faulty core is a classic culprit, especially on Presta valves in a tubeless setup where you’re often removing them to add sealant. The good news? Diagnosing this is a piece of cake.
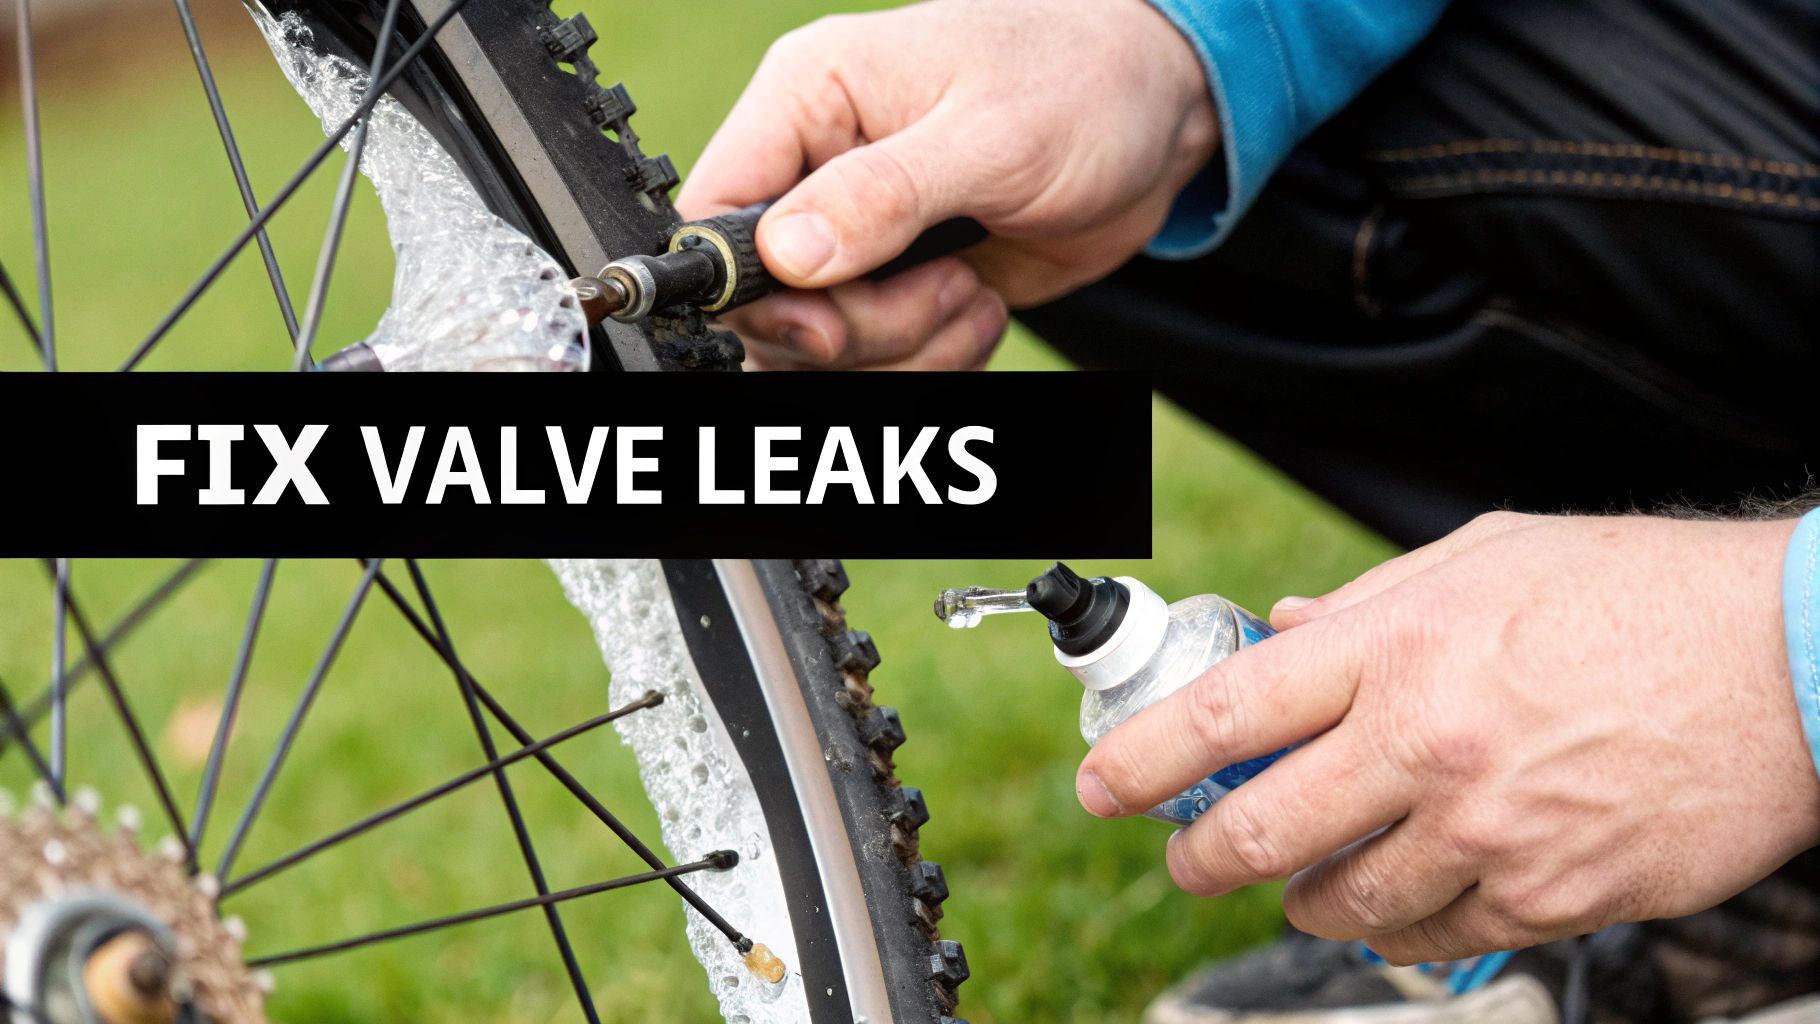
Finding and Fixing Leaks
The old soapy water trick is still the best way to find a sneaky leak. Mix a little soap and water, dab it around the valve, and look for tell-tale bubbles.
- Bubbles from the center: This is a dead giveaway your valve core is either loose or has gone bad.
- Bubbles at the base: This points to a bad seal between the valve stem and the rim. It's a common issue with tubeless tires if the valve nut isn't snug.
If you spot bubbles coming from the middle of a Presta valve, grab a valve core tool (or a small pair of pliers in a pinch) and give it a gentle clockwise turn. If it’s still leaking, the core's O-ring is probably shot and it's time for a replacement. Thankfully, that's a quick and cheap fix. If you're just getting started, our guide on inflating bike tires is a great primer on how these systems work.
Dealing with Stuck or Clogged Valves
Another fun one, especially if you ride mountain or gravel bikes, is a valve getting clogged with tire sealant. Over time, that liquid latex can dry up inside the valve stem and block airflow completely. You'll go to pump your tire and... nothing.
Don't force it! Trying to jam a pump onto a clogged valve is a great way to wreck both the pump head and the valve stem. The solution is usually much simpler.
For a Presta valve, just unscrew the core. Use something small and pointy—a paperclip, a spoke, or a dedicated tool—to gently pick the dried gunk out of both the core and the inside of the valve stem. For a Schrader valve, you can often break the clog free with a quick press on the center pin.
If a Schrader pin is stuck and won't depress, a drop of lubricant and a few gentle wiggles will usually free it up. And if you’ve managed to bend a Presta stem, you can try carefully straightening it with pliers, but consider it on borrowed time. It's been weakened and should be replaced as soon as you can to avoid it snapping off right when you need it most.
Got Valve Questions? We've Got Answers
Once you start tinkering with your bike, you'll inevitably run into some specific questions about valves. It happens to everyone. Whether you're swapping wheels, fixing a flat on the trail, or just trying to understand your bike better, getting the right answers is what turns you into a smarter, more capable rider.
Let's dive into some of the most common questions we hear.
Can I Put a Presta Valve in a Schrader Rim?
Yes, you can—but you need to do it right. A Schrader rim has a valve hole that’s about 8mm wide, while a skinny Presta valve is only 6mm. If you just stick the Presta valve in there, it’ll be swimming in that oversized hole.
This creates two big problems. First, it will rattle around, which is just plain annoying. More importantly, the sharp metal edges of the rim hole can shear right through the rubber base of the valve stem, leading to a sneaky, hard-to-patch flat. No thanks.
The fix is simple and cheap: a little part called a rim grommet or valve hole adapter. This tiny sleeve slides into the Schrader hole, shrinking it down to give your Presta valve a snug, secure fit. It protects the tube and stops the rattling. Problem solved.
Just remember, this is a one-way street. You can't ever cram a fat Schrader valve into a rim drilled for a skinny Presta. It just won't fit.
What Is a Removable Valve Core and Why Should I Care?
A removable valve core is exactly what it sounds like: the small, threaded pin and spring mechanism inside the valve that you can unscrew with a special tool. While some Schrader valves have them, they're a must-have feature on most modern Presta valves, especially for high-performance bikes.
So, why does this matter? It's a game-changer in a few key situations:
- Tubeless Setups: This is the big one. Pulling the core opens up the valve completely, letting you inject tire sealant with a syringe. It's fast, mess-free, and you don't have to break the tire's bead seal on the rim.
- Valve Extenders: If you're running deep-section aero wheels, your standard valve stem won't be long enough. Valve extenders thread onto the valve body after you remove the core, giving you the reach you need.
- Quick Fixes: Valve cores can get clogged with dried sealant or just get bent and damaged. Instead of tossing the whole tube or tubeless valve, you can just unscrew the old core and pop in a new one in seconds. It saves time, money, and a lot of frustration.
Why Are My Tires Losing Air if the Valve Isn't Leaking?
This is a classic head-scratcher. You did the soapy water test, and your valve is solid, but your tire is still soft by morning. What's going on? If the valve is innocent, the air has to be getting out somewhere else.
First off, all tires bleed a tiny bit of air over time right through the rubber. It's a natural process called permeation, and it's especially noticeable with high-pressure road tires. A few PSI a day is pretty normal.
But if you're losing significant pressure overnight, you've probably got a slow leak. The most likely culprit is a minuscule puncture in the tube from a thorn or shard of glass you can't even see. Other suspects include worn-out rim tape that's letting the tube push into the spoke holes, or a weak spot in the tire-to-rim seal on a tubeless setup.
Once you’ve confirmed the valve is good, your next move is to methodically check the tube, tire, and rim tape to hunt down the real source of the leak.
Ready to upgrade your ride with a powerful and reliable electric bike? Check out the full lineup of e-bikes and electric dirt bikes at eBike Gang, LLC and find the perfect model for your next adventure. Visit us at https://ebikegang.com to learn more.