

Getting a flat is never fun, but on an e-bike, it can feel like a major disaster if you're not prepared. The key to a stress-free e-bike tire repair isn’t just about what you do when the tire goes flat—it's about having the right tools in your bag before you even leave the house.
An e-bike toolkit is a different beast than one for a standard bicycle. You're dealing with heavier parts, much higher torque specs, and delicate electronics. If you try to muscle through a repair with the wrong gear, a simple puncture can quickly escalate into a seriously frustrating problem, or worse, you could end up damaging your bike.
Building Your Essential E-Bike Repair Kit
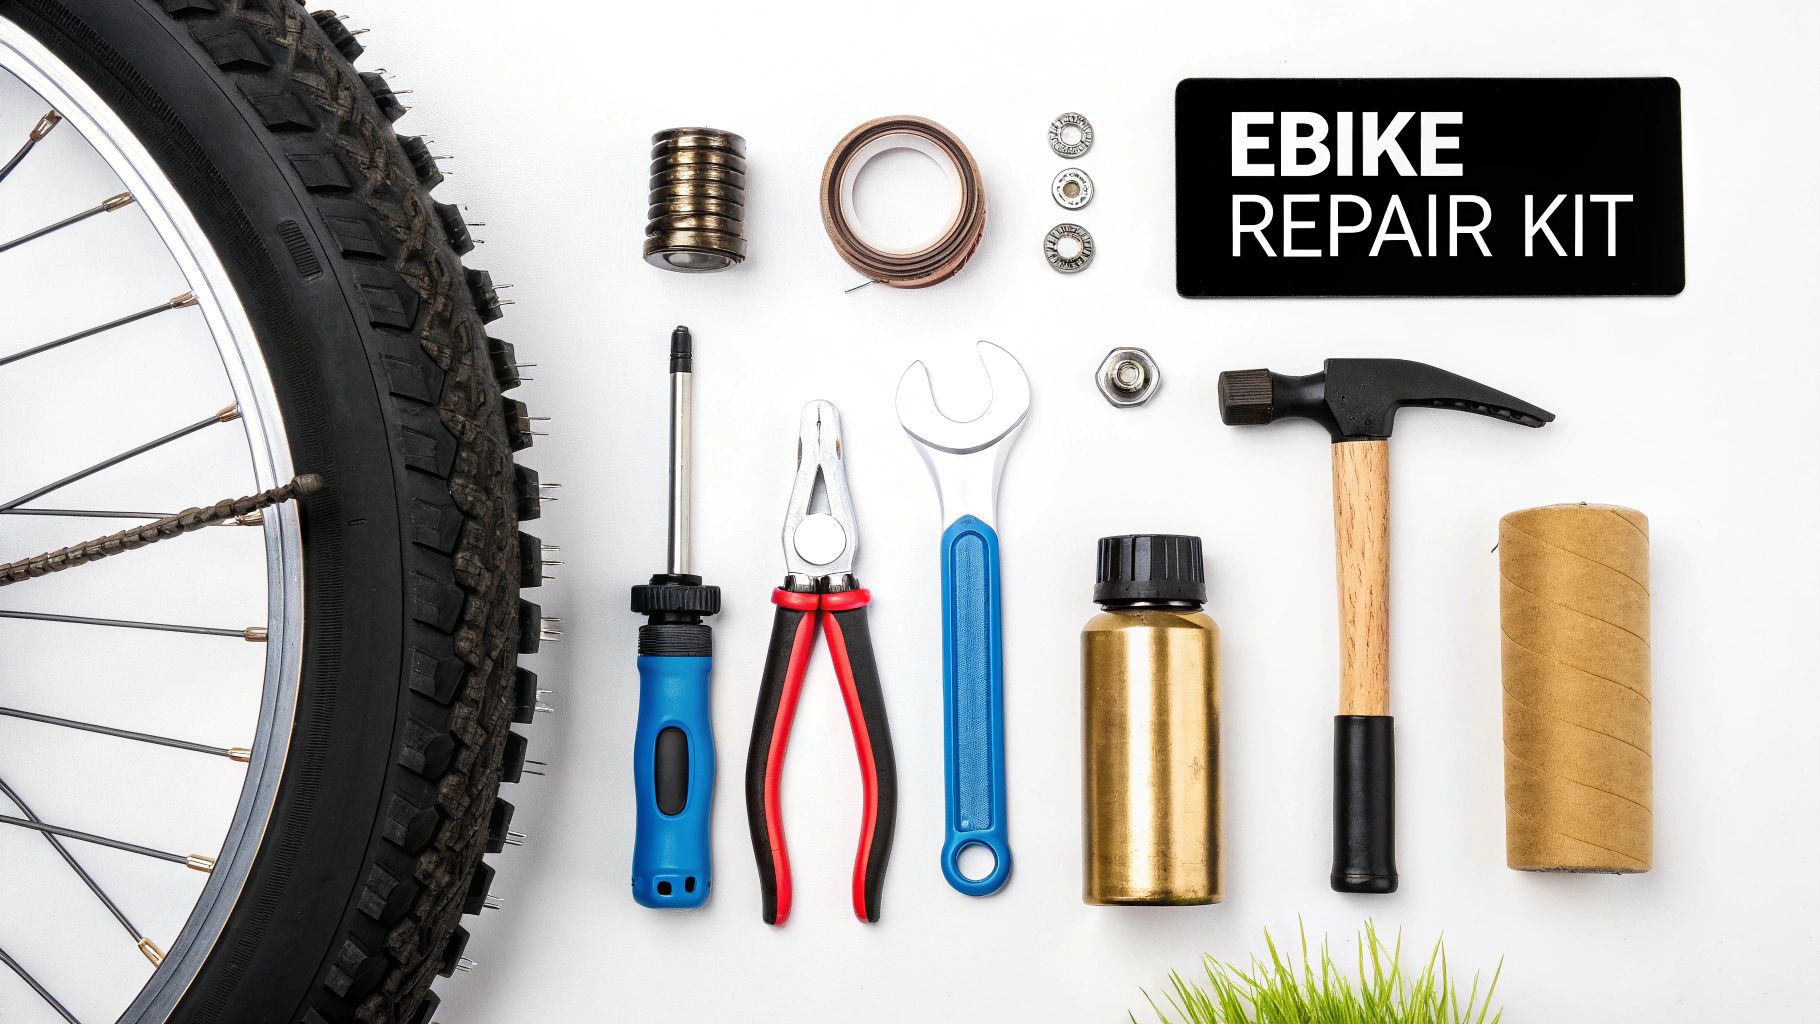
A successful repair is all about preparation. The sheer weight and complexity of an e-bike, especially one with a rear hub motor, call for tools that are tougher and more specialized than what you’d find in a basic roadside kit. Putting together a dedicated e-bike kit means you're ready for anything, from a tiny thorn to the hassle of pulling off a heavy, motor-driven wheel, all without risking your bike's safety.
This isn't just about tossing in any old tire levers and a patch kit. It’s about having tools that can actually stand up to the unique demands of an e-bike.
Core Tools for Every E-Bike Rider
Every rider needs the basics, but for an e-bike, think "heavy-duty." Your standard tools need a serious upgrade to handle the beefier components you'll be working with.
- Heavy-Duty Tire Levers: E-bike tires are tough, often with reinforced casings and a bead that seems glued to the rim. Flimsy plastic levers don't stand a chance; they'll just snap. You need a solid set made from reinforced nylon or, even better, with a metal core.
- High-Volume Pump or CO2 Inflator: Getting the right pressure is critical for safety and performance on a heavy e-bike. A good mini-pump that includes a pressure gauge is a must, or a CO2 inflator with a couple of spare cartridges for a lightning-fast refill.
- Patch Kit or Tubeless Plug Kit: Your choice here depends entirely on your setup. If you have tubes, grab a quality patch kit with good adhesive. For tubeless riders, a "bacon strip" plug kit is the absolute best for quick, on-the-spot fixes.
Expert Tip: When you're plugging a tubeless tire, push the plug in and then immediately rotate the wheel so the hole is at the six o'clock position. This lets the sealant pool around the plug, creating a much more reliable, long-lasting seal.
E-Bike-Specific Must-Haves
Now, let's get into the e-bike specifics. There are a few tools that are non-negotiable if you're serious about being self-sufficient, especially if you have a hub motor. These are what separate a prepared rider from one waiting for a ride home.
First on the list is a torque wrench. This is a big one. Hub motor axle nuts need to be tightened to a very specific spec from the manufacturer, which is usually somewhere between 30–40 Nm. If it's too loose, the wheel can shift under the motor's power and chew up your frame and wiring. Too tight, and you risk destroying the bearings inside the motor. A compact, portable torque wrench is genuinely one of the smartest buys any e-bike owner can make.
You'll also need the right size wrench or socket for your axle nuts—most are 18mm or 19mm. While an adjustable wrench can get you out of a jam, a dedicated socket gives you a much better grip and seriously reduces the chance of stripping the nut. I also like to keep a few small zip ties and flush cutters in my bag; they're incredibly handy for tidying up motor cables when you're taking the wheel off and putting it back on.
To get a better idea of what a complete setup looks like, checking out a pre-built cycle maintenance kit can give you a great head start on building your own.
Finally, a few small things make a huge difference:
- Disposable Gloves: Keep your hands free of grease, sealant, and general road gunk.
- Shop Rags or Paper Towels: Absolutely essential for cleaning up messy sealant or wiping down parts.
- Spare Inner Tube: This is my ultimate backup plan. Even if I'm running a tubeless setup, a spare tube will get me home if I get a gash that's just too big for a plug to handle.
To help you get started, here's a breakdown of the essentials and why they matter so much for e-bikes.
E-Bike Repair Kit Breakdown
| Tool or Supply | Why It Is Critical for E-Bikes | Expert Recommendation |
|---|---|---|
| Torque Wrench | Hub motor axle nuts require precise torque (30-40 Nm) to prevent frame/motor damage. | A preset or adjustable torque wrench that covers the 30-40 Nm range is ideal. Park Tool or similar brands are reliable. |
| Heavy-Duty Tire Levers | E-bike tires have stiff sidewalls and tight beads that can snap standard levers. | Look for levers with a steel core or those made from a robust composite material, like Pedro's Tire Levers. |
| 18mm or 19mm Wrench/Socket | This is the standard size for most hub motor axle nuts. An adjustable wrench is a poor substitute. | A long-handled wrench or a socket with a ratchet provides the best leverage for loosening tight nuts. |
| High-Volume Mini-Pump | Larger e-bike tires require more air volume to reach proper pressure (PSI). | Topeak Roadie DA G or a similar model with a built-in gauge ensures you're not guessing on pressure. |
| Tubeless Plug Kit | The fastest and most effective way to repair a puncture on a tubeless e-bike tire. | Stan's NoTubes DART or a "bacon strip" style plug kit is a trailside lifesaver. |
| Spare Inner Tube | The ultimate failsafe for a catastrophic flat that sealant or plugs can't fix. | Always carry a tube that matches your tire size, even if you run tubeless. |
| Zip Ties & Cutters | Essential for managing motor cables and wires during rear wheel removal and reinstallation. | A few small zip ties and a pair of flush cutters take up almost no space and are invaluable. |
Having these items on hand will transform a ride-ending flat into a minor inconvenience you can handle yourself.
How to Figure Out What's Wrong With Your E-Bike Tire
Before you can fix a flat, you have to play detective. Seriously. Just jumping in and slapping on a patch without finding the real problem is a surefire way to end up stranded a few miles later. I've seen it happen countless times.
Was it a tiny thorn causing a slow leak? A nasty gash from some glass on the road? Or is it something sneaky, like a bad valve? Figuring out the "why" is just as important as the "how," because it helps you keep it from happening again.
The Look, Listen, and Feel Test
Your best tools, to begin with, are your own eyes and ears. Give the wheel a slow spin. Listen carefully for that tell-tale hiss of escaping air—it's the quickest way to find a bigger puncture and can save you a ton of hassle.
As you're rotating the tire, run your fingers very carefully over the tread. You're feeling for the culprit: a sharp bit of glass, a metal sliver, or a stubborn thorn. If you find something stuck in there, don't yank it out yet! The best move is to mark the spot. A piece of chalk is great, but even wedging a tiny pebble in the tread nearby works. This way, you can easily find the hole once the tire is off.
Here's a pro tip that gets missed all the time: check the valve. Give the valve stem a gentle wiggle. If you hear or feel air escaping from where it meets the rim, you've found your leak. A loose or damaged valve is a common gremlin that's often mistaken for a puncture.
Finding Those Sneaky, Invisible Leaks
Sometimes a puncture is so small you can't see or hear it, especially those annoying slow leaks that deflate your tire over a few hours. When that happens, it's time to break out a classic, foolproof trick.
- Bring on the Bubbles: Mix a little dish soap with water in a spray bottle (or just a bowl). Pump some air into the tire, then spray or wipe the soapy water all over the tread, the sidewalls, and especially around the valve.
- Watch Closely: You're looking for bubbles to form. Even the tiniest pinhole leak will create a little stream of bubbles, showing you exactly where the problem is.
Once you’ve found the leak, you're ready to tackle the right kind of ebike tire repair. Keeping your tires at the right pressure is also a huge part of preventing and finding flats. For a full rundown, check out our guide on how to properly inflate bike tires.
What to Look for on Tubeless Tires
Tubeless setups have their own set of clues. The whole point is for the sealant inside to do its job, but you need to know its limits.
If you see a small, damp spot on your tire where a little sealant oozed out and then dried, that's a good thing! It means the system worked as designed. But if you see sealant actively spraying out or the tire just won't hold air, the hole is probably too big for the sealant to handle on its own. That's your cue to grab a tubeless plug kit.
Don't forget to check the sidewalls. Tires made for e-bikes have tougher, reinforced sidewalls to deal with the extra weight and motor torque. Look them over for any cuts, scuffs, or cracks. Damage in this area is a much bigger deal and usually means you'll need a new tire, not just a simple fix.
Repairing a Traditional Tubed E-Bike Tire
Fixing a flat on a tubed tire is a rite of passage for any cyclist, but when it’s an e-bike, things get a little more complicated. The extra weight, those sensitive motor wires, and the beefier tires all demand a more careful approach than you’d take with a standard bike. Getting this right isn't just about getting back on the road; it's about protecting the expensive heart of your ride.
The whole process can feel a bit intimidating, especially when you’re dealing with a rear flat where the hub motor lives. But trust me, if you take your time and follow the right steps, you can absolutely tackle this yourself.
Safely Removing the Rear Wheel
The biggest hurdle with a rear flat is usually just getting the wheel off without wrecking the motor cable. This cable is your motor's lifeline, and its connector is filled with delicate little pins that are surprisingly easy to bend or break if you get rough with them.
First, find that motor cable connector. It's almost always a chunky, round plug somewhere along the chainstay. Most have little arrows or marks to help you line them up and are often secured with a threaded collar.
- Disconnect with Care: Gently unscrew the collar and pull the two ends of the connector straight apart. Never, ever twist or yank them.
- Create Some Slack: You'll probably need to snip a zip tie or two holding the cable to the frame. This gives you enough wiggle room to work without putting stress on the connection.
- Loosen the Axle Nuts: Grab the right size wrench (usually an 18mm or 19mm) and loosen the big axle nuts on both sides. They’re on there tight for a reason, so you might need to put some muscle into it.
Once the nuts are loose, the wheel should drop right out of the frame. Just be ready for the weight—it’s a lot heavier than a non-electric wheel, so support it as you guide it out.
Getting the Tire and Tube Off
E-bike tires can be a real pain to get off the rim. Their stiff, reinforced sidewalls are fantastic for puncture protection but make them a bear to work with. This is where a good set of heavy-duty tire levers becomes your best friend.
Hook one lever under the tire bead, on the opposite side from the valve stem, and pry a small section up and over the rim wall. Latch that lever onto a spoke to hold it in place. Then, take your second lever and start working your way around the tire, unseating the bead a few inches at a time. Once one side is completely free, you can just pull the old inner tube right out.
Before you get your hands dirty, a quick diagnostic can save you a ton of guesswork.
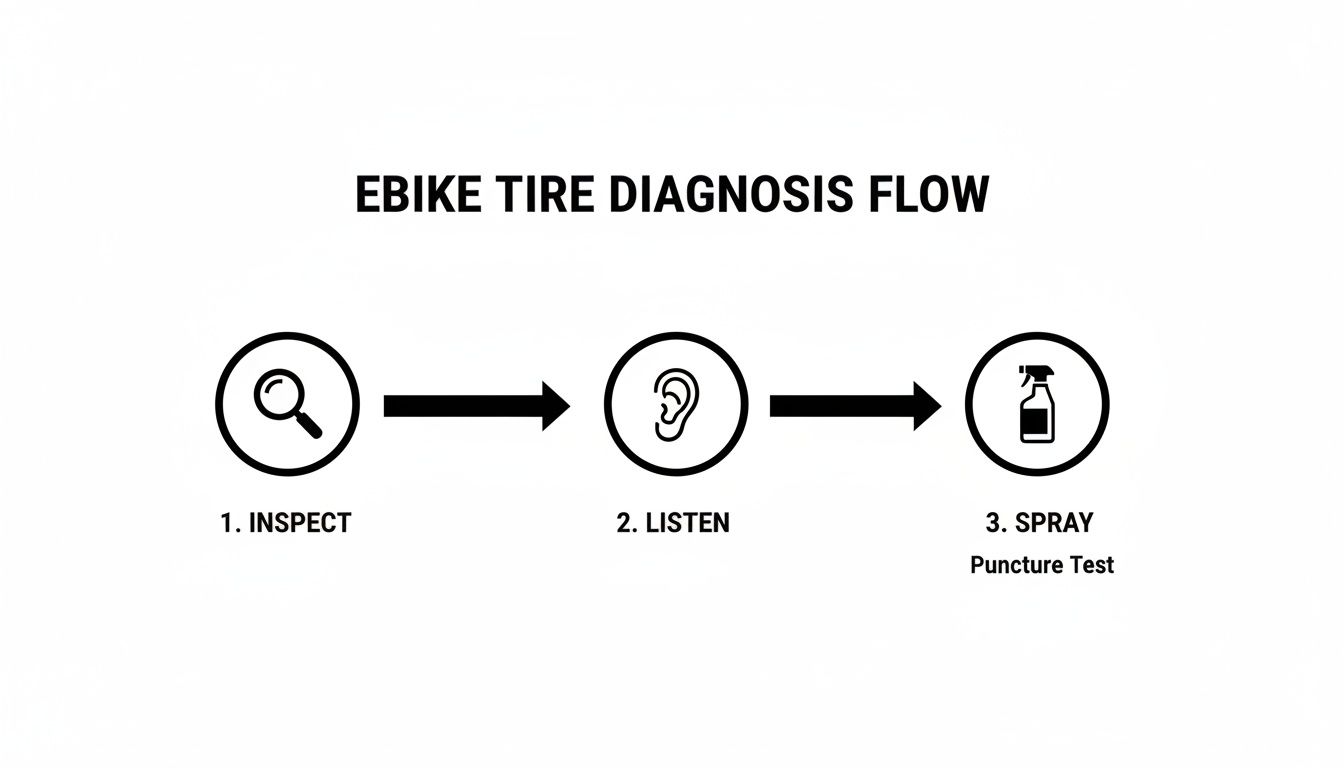
This simple flow—inspect, listen, and spray—helps you pinpoint the leak before you even think about patching or replacing anything.
Patching vs. Replacing the Inner Tube
With the tube out, you’ve got a decision to make: patch the hole or just toss in a new tube.
My two cents: While patching is a great skill to have, I almost always recommend replacing the tube, especially if you're stuck on the side of the road. It’s faster, far more reliable, and you can always take the punctured tube home to patch properly later. A new tube is a cheap and effective guarantee of a solid fix.
If you do decide to patch it:
- Find the Leak: Pump a little air into the tube and listen for the hiss. If you can't hear it, dunking it in a puddle or a sink full of water will reveal the culprit with a stream of bubbles.
- Prep the Area: Use the little piece of sandpaper in your patch kit to rough up the rubber around the hole. This is key for getting the adhesive to stick.
- Apply and Press: Spread a thin layer of glue, wait for it to get tacky, and then press the patch on firmly. Hold it down for at least a minute to ensure a good bond.
Before you put in the new or patched tube, do this one crucial thing that so many people forget: carefully run your fingers along the inside of the tire. You're feeling for whatever caused the flat in the first place—a sliver of glass, a sharp rock, or a metal wire. If you don't remove it, you'll just have another flat in five minutes.
Reinstallation and Final Checks
Putting it all back together is just the reverse, but with the same need for attention to detail. Lightly inflate the new tube until it just holds its shape, then tuck it inside the tire. Starting at the valve, use your thumbs to work the tire bead back onto the rim. For that last, tight section, you might need a lever, but be incredibly careful not to pinch the new tube.
Lift that heavy wheel back into the frame’s dropouts, making sure the axle is seated all the way in. Reconnect the motor cable, lining up those arrows perfectly before you tighten the collar down.
Finally, tighten the axle nuts. This is where a torque wrench is non-negotiable. You need to tighten them to the manufacturer's spec, which is usually 30-40 Nm. This prevents the wheel from shifting or even coming loose under the motor’s power, which can be incredibly dangerous.
It's also wild to think about the scale of this. E-bike tires see a lot of wear, driving a massive repair industry, especially in markets like China where over 300 million e-bikes are in use. Delivery riders there can get a puncture every 500-1,000 km in tough city conditions, making a fast, reliable repair process essential. You can read more about the global bicycle tire market and its trends on Future Market Insights.
Dealing with Tubeless E-Bike Tires
One of the best upgrades you can have on an e-bike is a tubeless tire setup. The ride feels better, and the built-in puncture protection from the sealant is fantastic. But when you get a hole that's too big for the sealant to handle alone, a lot of riders get nervous.
Don't be. The most common tubeless repair is actually pretty simple and, more often than not, you won't even have to take the wheel off your bike. We'll walk through the two skills every tubeless rider needs: plugging a puncture to get you home, and keeping your sealant fresh so it can do its job. Once you have these down, you'll be able to tackle almost any flat with confidence.
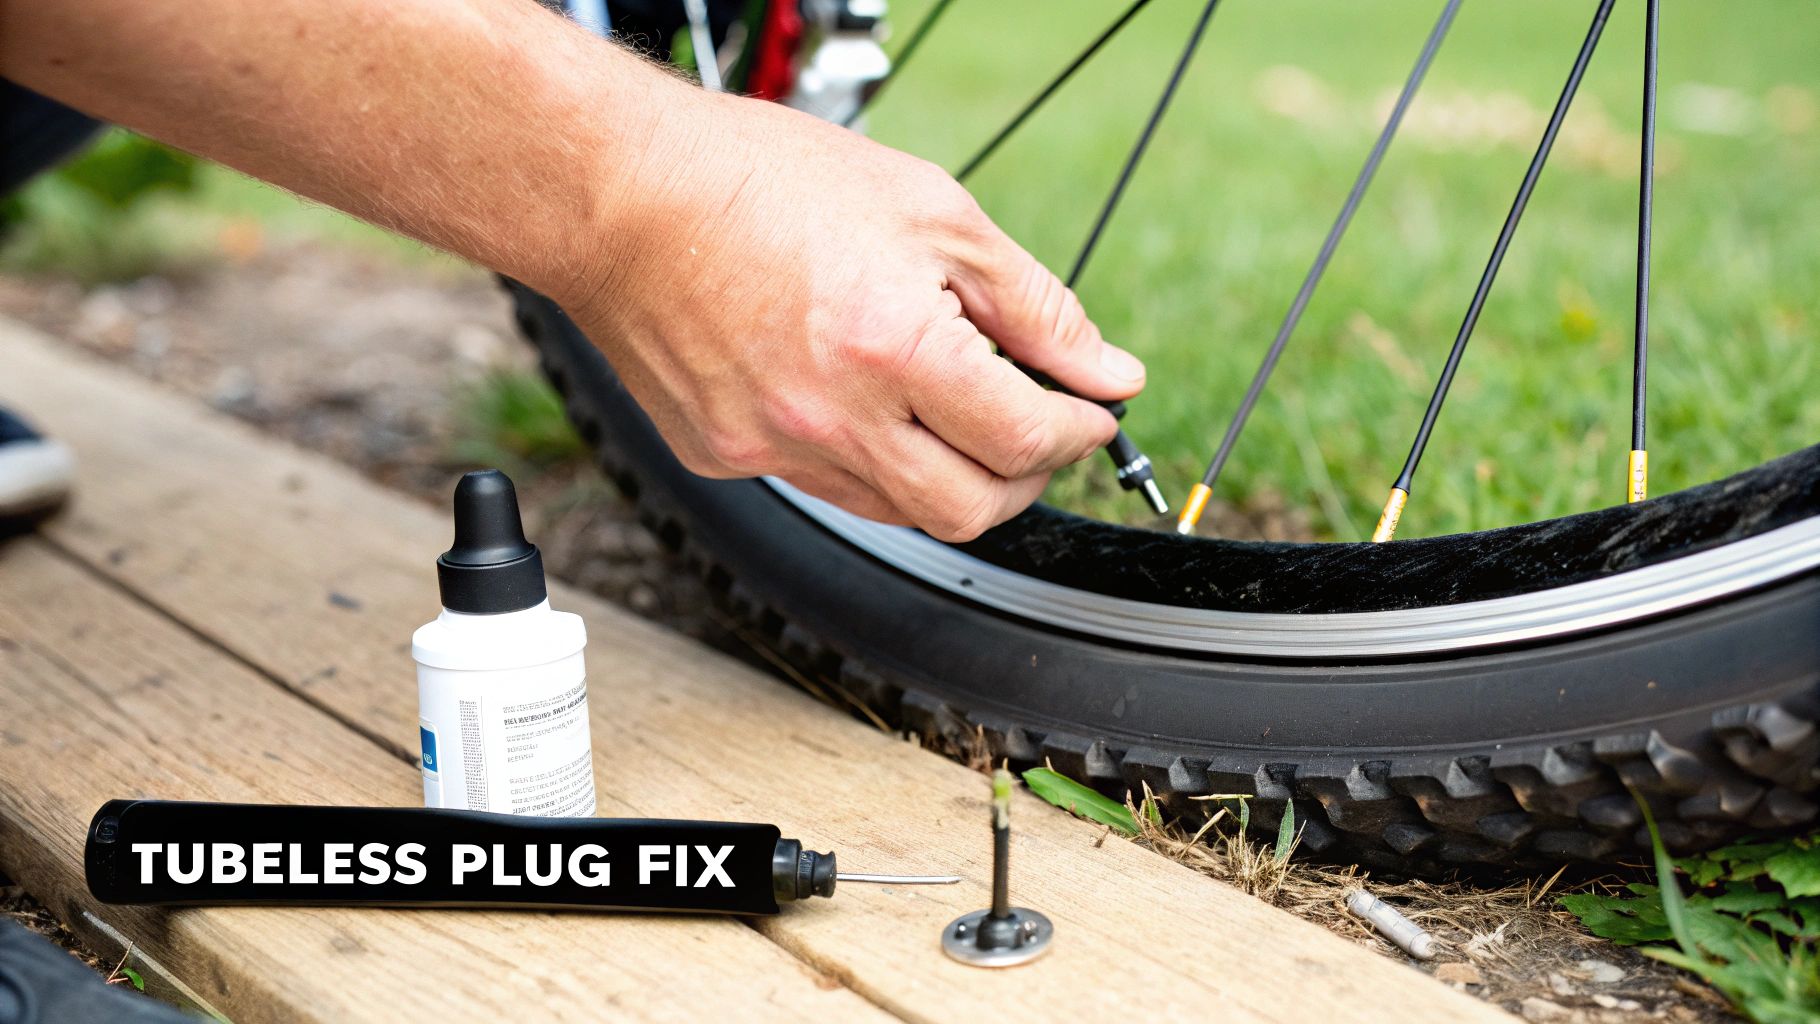
The Trailside Fix: Plugging a Puncture
Think of a tubeless plug—sometimes called a "bacon strip"—as your get-out-of-jail-free card for bigger punctures. It's an incredibly fast and effective way to fix a hole that's just weeping sealant, getting you back on the move in a matter of minutes.
The whole process is pretty straightforward. First, you've got to find the leak. If you can't see the offending thorn or piece of glass, just splash some water on the tire and look for the bubbles. Whatever you do, leave the object in the tire for now! It perfectly marks the spot.
Grab your plug kit, which should have a reamer tool (for roughing up the hole) and an insertion tool (for the plug itself).
- Prep the Hole: Pull the object out of the tire and, in one quick motion, shove the reamer tool in its place. Work it in and out a few times to clean up the puncture and give the plug something to grip.
- Insert the Plug: Thread one of the sticky "bacon strips" into the fork-like insertion tool. Push it firmly into the hole until just a little bit of the plug is left sticking out.
- Seal it Up: With a quick, decisive yank, pull the tool straight out. It's designed to leave the plug behind, wedged in the tire. The sticky plug fills the hole, and the sealant rushes in to create a permanent, airtight bond.
All that's left is to trim the excess plug material, leaving about a quarter-inch sticking out. Spin the wheel to get sealant all around the new plug, pump up your tire, and you’re good to go.
Keeping Your Sealant Shield Strong
Here’s something a lot of people forget: tubeless sealant doesn’t last forever. The liquid latex inside your tire eventually dries out, becoming useless. A system that fails when you need it most is often just a case of old, dried-up sealant.
As a general guideline, plan on checking your sealant levels every 3 to 6 months. If you live in a hot, dry climate, you'll be on the shorter end of that spectrum. An easy check is to just shake your wheel; if you hear liquid sloshing around, you're probably okay. If it's silent, it's time for a top-up.
My Two Cents: Don't just keep adding new sealant to old. At least once a year, I recommend taking the tire completely off, cleaning out all the dried gunk (we call them "sealant boogers"), and starting with a fresh pour. It's a bit more work, but it guarantees your sealant will perform its best.
Topping up is simple. Just let all the air out and use a valve core tool to remove the valve core. Knowing which kind of valve you have is handy here; for a deeper dive, our guide on bicycle tire valve stem types has you covered.
With the core out, you can use a syringe or a small squeeze bottle to inject about 2-4 ounces of sealant right through the valve stem. Screw the valve core back in, inflate the tire, and give it a good spin and a shake to coat the inside. This one piece of maintenance is the best flat prevention there is.
Knowing When to Call It: Limits of a Plug
Plugs are miracle workers, but they aren't magic. It's just as important to know when not to use one.
- Puncture Size: Plugs are for round holes from things like nails, thorns, or screws—usually up to about a quarter-inch wide.
- Sidewall Damage: Never try to plug a sidewall. The wall of the tire flexes constantly as you ride, and a plug simply won't hold. A hole in the sidewall almost always means it's time for a new tire.
- Big Gashes: If you have a long slice or cut instead of a neat hole, a plug isn't going to seal it. Your best bet in this situation is to boot the inside of the tire and install a spare inner tube just to get home.
Understanding where to draw the line is key to staying safe. For anything more serious than a simple puncture, the only truly reliable fix is a new tire.
How to Prevent Flats and Extend Tire Life
The best e-bike tire repair is the one you never have to make. Honestly, while knowing your way around a patch kit is a great skill, a little bit of prevention goes a long way in saving you a ton of hassle. Building a few simple habits into your routine can dramatically cut down your chances of getting stranded and squeeze more life out of your tires.
It really starts with accepting that e-bikes are different. The extra weight from the battery and motor, plus the instant torque, puts a unique kind of stress on your rubber. What works for a featherlight road bike just doesn't cut it here. Prevention is all about getting ahead of the problems before they start.
Nail Your Tire Pressure Every Time
If you take only one piece of advice from this guide, let it be this: maintain the proper tire pressure. It is, without a doubt, the single most important check you can perform. For an e-bike that can easily weigh 50-70 pounds (or more!), correct inflation is completely non-negotiable.
Low pressure is the number one cause of "pinch flats," which happen when you hit a pothole and the inner tube gets smashed between the tire and the rim. The sheer weight of an e-bike makes this a huge risk. On the flip side, a rock-hard, overinflated tire doesn't absorb impacts well, giving you a harsh ride and making you more vulnerable to punctures from sharp debris.
So, where's the sweet spot? Just look at the side of your tire. The manufacturer prints the recommended pressure range right there, usually as something like "35-65 PSI".
Your ideal pressure is a personal thing—it's a balance between your weight, your bike's weight, and where you ride. A good starting point is right in the middle of that recommended range. Heavier riders should stick to the higher end, while lighter folks can go a bit lower for a cushier ride.
Get in the habit of checking your pressure with a good gauge before every ride. It takes less than a minute and is the most effective thing you can do to stop flats before they happen.
Add a Physical Shield with Tire Liners
For those of us who ride on debris-filled city streets or thorny trails, tire liners are a cheap and brilliant upgrade. Think of them as a suit of armor for your inner tube. A liner is just a tough, flexible strip of polyurethane that you install between the tire and the tube, creating an extra layer of defense.
This simple addition can be the difference-maker that stops glass shards, thorns, and bits of metal from ever reaching the tube. They add a little weight, sure, but the peace of mind they deliver is worth it, especially if you're a daily commuter who can't afford the downtime of an unexpected e-bike tire repair.
Keep Tubeless Sealant Fresh and Ready
Running a tubeless setup? Your first line of defense is that milky sealant sloshing around inside. This stuff is magical—it rushes to any new puncture and plugs it with latex particles, often before you even realize you've lost any air. But here's the catch: it’s not a "set it and forget it" solution.
Over time, the liquid base evaporates, leaving behind a useless clump of dried latex. A good rule of thumb is to check and top off your sealant every 3 to 6 months. If you live somewhere hot and dry, you'll be on the shorter end of that schedule. Not sure if it's time? Give the wheel a good shake; if you don't hear any liquid sloshing around, it’s time for a refresh.
Make a Habit of Regular Inspections
Finally, a quick visual check can help you spot trouble long before it sidelines you. Just take 30 seconds before or after your ride to give your tires a quick once-over.
- Scan the Tread: Look for any embedded glass, tiny rocks, or metal slivers that haven't quite made it through… yet.
- Inspect the Sidewalls: Keep an eye out for cuts, cracks, or any weird bulging. Sidewall damage is a serious red flag and almost always means the tire needs to be replaced immediately.
- Look for Wear: Most tires have a "wear indicator," which is usually a small dimple or line in the center of the tread. Once it's gone, it's time for a new tire. Uneven wear is also a clue that your inflation might be off.
Turning these simple checks into a routine will help you spend way more time riding and a whole lot less time on the side of the road with a flat.
Common Questions About E-Bike Tire Repair
Even after you get the hang of fixing a flat, some of the finer points of e-bike tire repair can be a bit tricky. Every bike and every rider is different, and sooner or later, a situation will pop up that leaves you wondering. Let’s tackle some of the most common questions we hear from e-bike owners.
Getting these details right can save you a ton of time, money, and frustration down the road. Think of it as building your expertise so you can handle anything the trail (or tarmac) throws at you.
Can I Use a Car Tire Patch Kit on My E-Bike Tire?
In a word: no. While it might seem like a clever hack if you're in a bind, you should never use a car tire plug kit on your e-bike tire. It's a classic case of using the wrong tool for the job. Plugs for cars are thick, stiff, and designed to be jammed into the incredibly tough, steel-belted casing of an automotive tire.
An e-bike tire is a much more delicate system. Forcing one of those beefy car plugs in will likely stretch and tear the tire's casing, doing more harm than good. You could end up with a permanent weak spot that bulges under pressure or, worse, a hole that can no longer be sealed. Always stick to kits made specifically for bicycles—their plugs are smaller, more pliable, and designed to work with your tire, not against it.
How Often Should I Replace Tubeless Sealant?
That magical tubeless sealant is your best friend for preventing flats, but it doesn't last forever. As a general rule of thumb, you should probably check on it and refresh it every 3 to 6 months. The liquid carrier evaporates over time, leaving behind the solid sealing particles and reducing its effectiveness.
A few things can speed up that timeline:
- Climate: If you live in a hot, dry place like Arizona, expect your sealant to dry out much faster than it would in a humid climate.
- Riding Frequency: The more you ride, the more the sealant sloshes around coating the inside of the tire, which can accelerate the evaporation process.
- Storage Conditions: Keeping your bike in a cool, dark garage will help the sealant last longer than if it's stored in a hot shed.
An easy way to check your sealant level is to take the wheel off the bike and give it a good shake. If you can hear liquid sloshing around, you're probably still in good shape. If all you hear is silence, it's definitely time for a top-up to keep that puncture protection active.
Do I Need a Special Tire for a Hub Motor E-Bike?
Technically, you can fit a standard bicycle tire on a hub motor wheel, but you really shouldn't. It’s a much better idea to use an e-bike-rated tire, especially if you have a powerful hub motor. These tires are engineered from the ground up to handle the unique stresses an electric bike puts on them.
E-bike-specific tires have reinforced casings and much tougher sidewalls. This construction helps them manage the bike's extra weight, sustain higher speeds, and withstand the instant torque delivered by the motor. That beefier build gives you better puncture resistance and ensures the tire wears down evenly instead of squaring off prematurely. Running a standard tire is just asking for more flats and less predictable handling.
What Is the Hardest Part of Fixing a Rear E-Bike Flat?
For most people, the tire itself isn't the problem. The real challenge is dealing with the rear hub motor and all the wiring that comes with it. It’s less about patching a tube and more about carefully navigating the heavy, electronically complex heart of your e-bike.
The steps that usually trip people up are:
- Disconnecting the Motor Cable: This isn't just any old plug. The connector has tiny, sensitive pins inside that are shockingly easy to bend or break if you pull on it at the wrong angle or use too much force.
- Wrestling with the Wheel: A hub motor adds a lot of weight. Just getting the wheel out of the dropouts and putting it back in without straining the motor cable or scratching your frame can be an awkward, clumsy process.
- Getting the Torque Right: When you put the wheel back on, you can't just crank down on the axle nuts. They need to be tightened to the manufacturer's spec (usually around 30-40 Nm) with a torque wrench. This isn't optional; it's a critical safety step to make sure your wheel doesn't shift or come loose while you're riding.
At eBike Gang, LLC, we believe that being prepared is the key to a great ride. Whether you're commuting to work or hitting the trails, our bikes are designed for performance and reliability. Explore our full range of electric bikes and dirt bikes to find your next adventure. Visit us at https://ebikegang.com to learn more.