

If you want to get the most out of your e-bike battery for years to come, you need to rethink everything you thought you knew about charging. It feels counterintuitive, but the single best thing you can do for your battery's lifespan is to avoid charging it to 100% all the time.
The real secret to a long-lasting, powerful battery is all about finding the sweet spot. It’s a simple shift in habit that pays huge dividends in performance and longevity.
The Golden Rules of Lithium Battery Charging
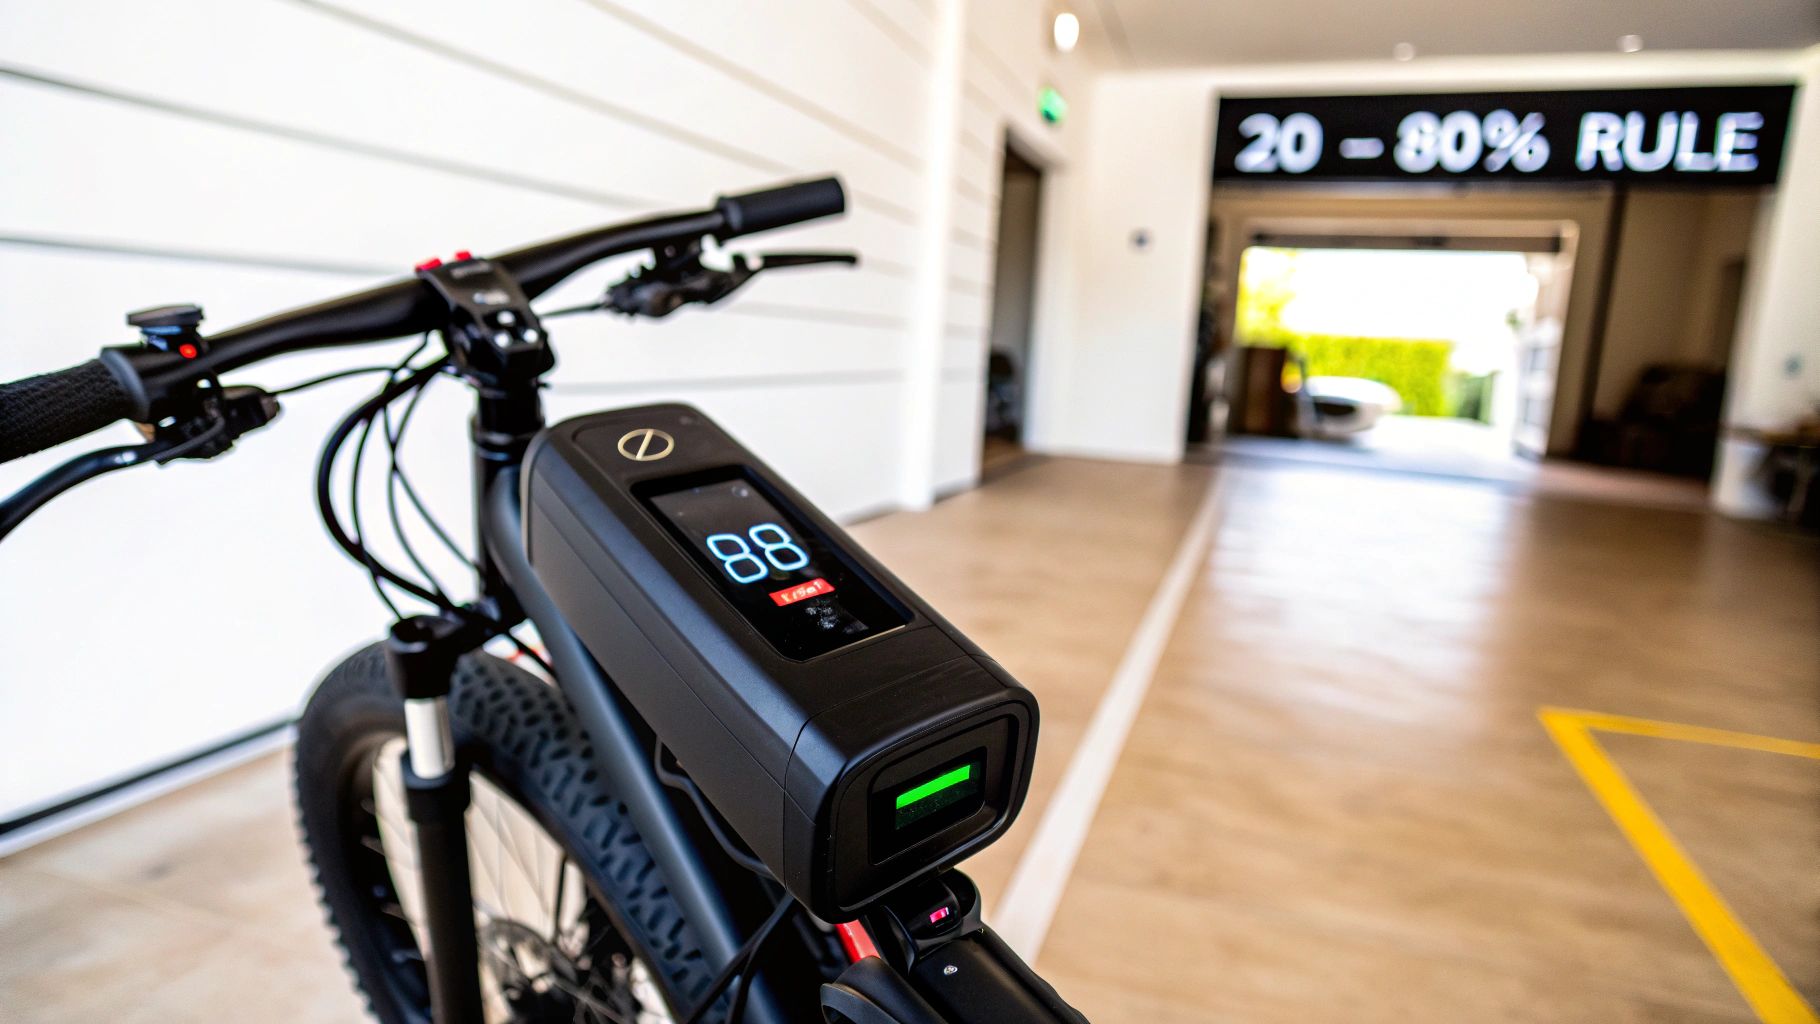
If you take away only one thing from this guide, let it be this: the 20-80% rule. This isn’t just a helpful hint; it's the bedrock principle of modern lithium-ion battery care, grounded in the very chemistry of the cells. The idea is simple: try to keep your battery’s charge level somewhere between 20% and 80%.
Think of your battery like a muscle. Pushing it to its absolute limit (a full 100% charge) or letting it become completely exhausted (a 0% charge) puts the most stress on it. Just like overtraining can lead to injury, constantly pushing your battery to these extremes causes its internal chemistry to break down faster.
By staying within that comfortable 20-80% zone, you drastically reduce that stress. This simple habit can literally double the number of charge cycles your battery can handle before you start noticing a drop in range and power.
Putting The 20-80% Rule Into Practice
So what does this actually look like day-to-day? It's about changing your mindset from "fill it up" to "top it up."
Instead of plugging in your bike overnight after every single ride, maybe you wait until the battery dips closer to 30% or 40%. When you do charge, just keep an eye on it and unplug it once it hits around 80% or 90%. A lot of new smart chargers can do this for you, but even with a basic charger, a bit of attention makes a huge difference.
Key Takeaway: Avoiding the extremes of a full 100% charge and a complete 0% discharge is the cornerstone of extending your battery's lifespan. The 20-80% window is where lithium-ion cells are happiest and experience the least amount of stress and degradation.
And this isn't just anecdotal advice. Since Sony first commercialized lithium-ion batteries back in 1991, our understanding of how to care for them has come a long way. Modern research shows that smart charging routines can cut down on capacity loss by as much as 48.6% compared to just plugging it in and letting it charge to full every time.
Finding Your Charging Rhythm
Getting into a good routine is what makes this easy. Here’s how experienced riders often approach it:
- Daily Commuters: If your round trip to work only eats up 20-30% of your battery, you don't need to charge every night. Maybe you charge it every second or third day instead.
- Weekend Warriors: Planning a big trail ride? Go ahead and charge it up to 80-90% the night before. If you know you'll need every bit of range, charging to 100% once in a while is perfectly fine—just don't make it your default.
- Post-Ride Cooldown: This one is critical. After a hard ride, your battery is warm. Let it sit and cool down for at least 30 minutes before you plug it in. Charging a hot battery is one of the fastest ways to kill it.
These core ideas aren't unique to e-bikes. The principles of smart charging apply to almost any device with a modern lithium battery. In fact, checking out Luminaid's guide on how to charge their devices shows how these universal rules are applied. By making these small adjustments, you’re not just charging a battery; you're making a long-term investment in your bike’s performance.
To help you remember the most important points, here's a quick summary.
Charging Best Practices At a Glance
This table breaks down the core principles for keeping your e-bike battery healthy and extending its lifespan.
| Practice | Why It Matters | Real-World Rider Benefit |
|---|---|---|
| Follow the 20-80% Rule | Reduces chemical stress on battery cells by avoiding extreme charge states. | Dramatically increases the total number of charge cycles and overall battery lifespan. |
| Avoid 100% Charges | Charging to 100% puts the most voltage strain on the cells, accelerating degradation. | Your battery holds more of its original capacity for longer, meaning better range over time. |
| Don't Drain to 0% | Deep discharging can damage cells and make them unable to hold a full charge again. | Prevents permanent capacity loss and ensures the battery remains reliable. |
| Cool Down Before Charging | Charging a hot battery (right after a ride) speeds up chemical aging. | Preserves battery health and prevents premature failure. More miles, more fun. |
| Charge to 100% Occasionally | A full charge (maybe once a month) helps the Battery Management System (BMS) recalibrate. | Ensures your battery's display shows an accurate percentage, so you don't get stranded. |
Treating your battery right from day one is the best way to ensure you get thousands of miles of reliable, powerful performance from your electric bike.
Why Your Charging Environment Is So Important
Forget the numbers on your battery display for a second. One of the single biggest factors affecting your battery's health is something you can feel on your skin: the temperature. Where you charge your e-bike isn't just about convenience; it’s a non-negotiable part of keeping your battery in top shape. Lithium-ion cells are sensitive little chemical powerhouses, and just like a performance engine, they have a temperature window where they truly thrive.
Charging in extreme heat or bitter cold isn’t just slow or inefficient—it causes real, permanent damage at a microscopic level. It's one of the easiest mistakes to make, but it's also one of the most destructive over time. Honestly, thinking about where you plug in is just as critical as following the 20-80% rule.
The Science Behind Temperature and Charging
Picture this: you're charging your e-bike in a sun-baked garage during a summer heatwave, where it’s easily over 100°F (38°C). Inside that battery, the intense heat is supercharging the chemical reactions. That might sound good, but what's really happening is a rapid breakdown of the battery's internal parts, leading to a permanent drop in capacity. It’s like leaving a carton of milk on a hot counter—it spoils much, much faster.
Now, let's flip the script. Imagine charging in a freezing shed in the middle of winter. When you plug in a battery that's below freezing, the lithium ions inside get sluggish and struggle to move. Instead of smoothly slotting into the anode where they belong, they can start to pile up on the surface. This process is called lithium plating, and it's bad news. It's permanent, it kills your battery's capacity, and it can even create dangerous internal short circuits.
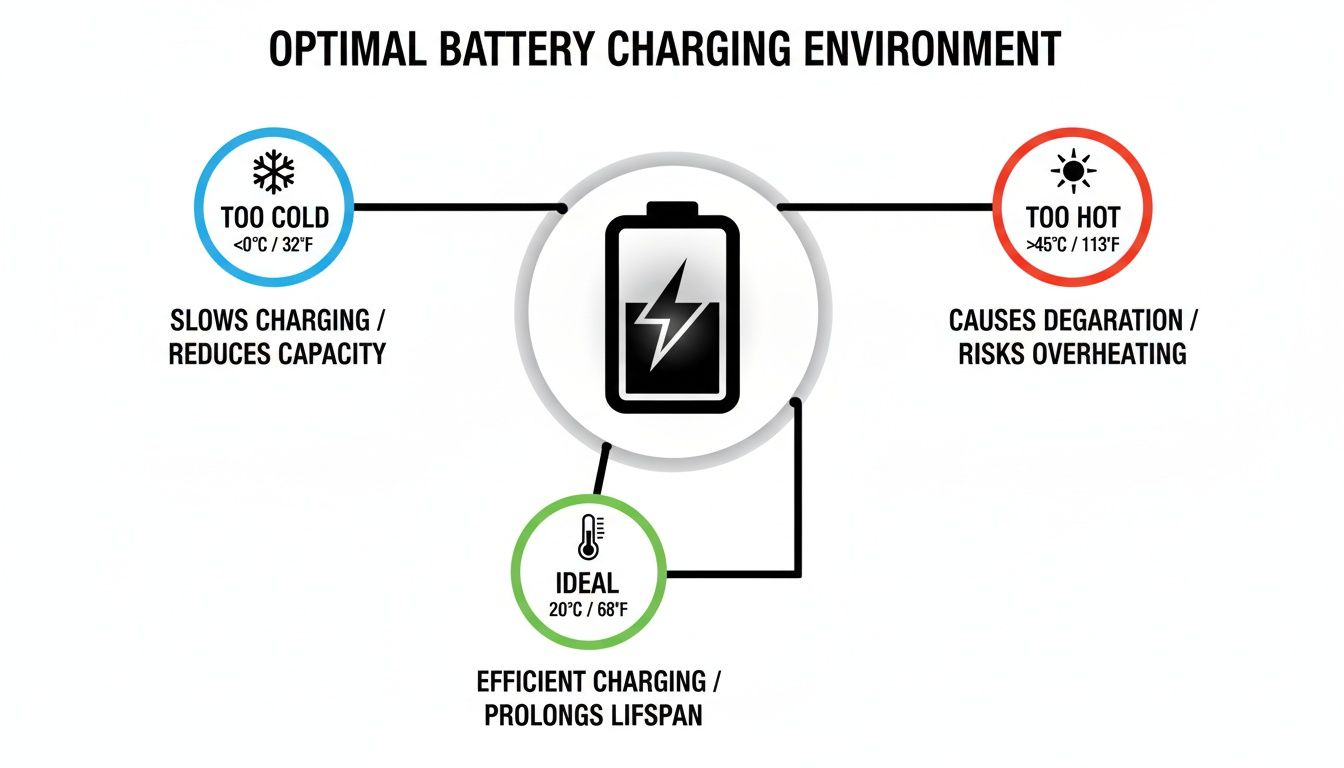
Key Takeaway: The sweet spot for charging most lithium-ion batteries is between 15°C and 35°C (59°F to 95°F). Charging outside this "Goldilocks zone" is a fast track to shortening your battery's life and compromising its safety.
This isn't just a minor detail, either. Studies have shown that trying to charge a battery below 0°C (32°F) can jack up its internal resistance by as much as 50%, forcing it to work way harder than it should. On the other end, charging above 45°C (113°F) drastically speeds up that chemical decay. The batteries that last the longest are almost always the ones consistently charged at a comfortable room temperature, right around 20°C (68°F).
For a deeper dive into the data, check out this comprehensive support bulletin on lithium battery best practices.
Practical Tips for a Safe Charging Space
Getting your battery to the right temperature before charging is a simple habit that pays huge dividends. You don't need any fancy gear—just a little forethought.
Let's walk through a common scenario: you just got back from a chilly winter ride. The bike and battery are cold to the touch. The absolute worst thing you can do is plug it in right away.
- Bring It Inside First: Always, always bring your battery indoors and let it sit for at least an hour to warm up to room temperature. This gives the internal chemistry a chance to stabilize before you hit it with a charge.
- Dodge Direct Sunlight: Never charge your battery in a sunbeam, whether it's next to a window or out on the porch. The sun can quickly cook the battery case to temperatures well above the safe zone.
- Give It Room to Breathe: The charging process itself generates a little heat. Make sure the charger and battery have some open space around them for air to circulate. Don't ever cover them with a blanket or shove them into a cramped cabinet.
It's also worth noting that ensuring your home's wiring can handle the load is important, especially if you have multiple high-draw devices. If you're ever in doubt, consulting a professional EV charger installation electrician can give you peace of mind that your whole setup is safe and up to code.
At the end of the day, the ideal charging spot is simple: a cool, dry, and shaded indoor location. This principle is closely tied to long-term care, as the best practices for charging overlap with those for storage. You can learn more in our guide on how to store lithium batteries safely. By managing the temperature, you're directly protecting your investment and making sure your e-bike is ready to roll for years to come.
Choosing and Using the Right E-Bike Charger
Think of your e-bike charger as a specialized key, precision-cut for the single, complex lock that is your battery. It's tempting to grab a generic, cheap charger online, but that's one of the riskiest things you can do for your bike. I've seen it happen too many times—it's a common mistake that can lead to irreversible damage or, even worse, a serious fire hazard.
The charger that came with your bike isn't just a simple power cord. It’s an intelligent device designed to communicate directly with your battery’s specific chemistry and its onboard Battery Management System (BMS). This constant dialogue is absolutely critical for safe and efficient charging.
This communication ensures your battery gets the right voltage and current at every stage of the charging process. An incompatible charger just blasts power without any of that nuance, which can easily lead to overvoltage, dangerous overheating, and permanent cell damage. Sticking with the original equipment is your first and most important line of defense.
Demystifying Charger Technology
To really appreciate why your specific charger is so important, it helps to understand what’s happening behind the scenes. Modern lithium-ion chargers use a smart protocol known as Constant Current/Constant Voltage (CC/CV). It’s not just tech jargon; it's a two-stage method that actively protects and optimizes your battery.
Here’s a simple breakdown of how it works:
- Constant Current (CC): In the first phase, the charger feeds a steady, controlled electric current into the battery. This does the heavy lifting, quickly and efficiently bringing the battery up to a target voltage.
- Constant Voltage (CV): Once the battery hits that target voltage, the charger switches gears. It holds the voltage steady while the current gradually tapers off as the battery cells become full. This "topping off" phase safely brings the battery to 100% without overstressing the cells.
This CC/CV protocol is the gold standard for charging lithium-ion batteries. Chargers are carefully matched to the battery's specs to deliver a charge rate between 0.5C and 1C. A mismatched charger can cause dangerous voltage swings and overheating, which is why sticking to the manufacturer's gear is so vital.
Understanding Charge Rates
Another key concept is the C-rate, which is just a simple way to describe how fast a battery is charged or discharged relative to its total capacity. For example, a 1C rate on a 15Ah (amp-hour) battery means charging it at 15 amps, which would theoretically take one hour. A 0.5C rate would be 7.5 amps, taking two hours.
Your manufacturer’s charger is engineered to deliver the optimal C-rate—one that’s fast enough for convenience but slow enough to prevent excess heat and premature aging. Using an unapproved "fast charger" with a higher C-rate is like force-feeding the battery. It generates a ton of damaging heat and will definitely shorten its lifespan.
My Two Cents: Your original charger is a safeguard. It’s programmed with the precise CC/CV profile and C-rate your specific battery needs. Using anything else is like throwing away the key and trying to pick the lock—you’re bypassing all the built-in protections and putting your expensive battery at risk.
The infographic below really drives home the critical role temperature plays in all of this, showing the ideal conditions for charging your battery safely.
As you can see, charging works best in a moderate, room-temperature environment. Trying to charge in a freezing garage or a hot car can cause significant, lasting harm.
Actionable Tips for Charger Use
Knowing the theory is one thing, but putting it into practice is what keeps your battery healthy. Here are a few simple habits to build into your routine.
- Inspect Before You Connect: Before plugging anything in, give your charger and its cables a quick once-over. Look for any signs of fraying, cracking, or damage to the connectors. If it looks sketchy, don't use it.
- Plug Into the Wall First: This is a great habit to get into. Plug the charger into the wall outlet first, then connect it to the battery. This lets the charger stabilize its output before sending power to your battery. When you’re done, reverse the order: unplug from the battery, then from the wall.
- Keep it Ventilated: Chargers generate heat. Always place yours on a hard, flat surface where air can circulate freely. Never cover it with a blanket or stick it on a soft surface like a rug or your bed.
Essential Charger Do's and Don'ts
Making the right choices with your charger is straightforward, but a single misstep can be costly. Here’s a quick-reference table to keep you on the right track.
| Do This | Don't Do This |
|---|---|
| ✅ Always use the charger that came with your bike. | ❌ Never use a generic or third-party charger. |
| ✅ Charge on a hard, non-flammable surface. | ❌ Never charge on a bed, sofa, or carpet. |
| ✅ Plug the charger into the wall outlet before the battery. | ❌ Never leave a damaged charger plugged in. |
| ✅ Keep the charger and battery in a well-ventilated area. | ❌ Don't cover the charger or block its vents. |
Think of this table as your go-to checklist for a safe charging routine. These simple habits can dramatically extend the life of your battery and prevent serious accidents.
By understanding the technology inside that power brick, you can make smarter decisions that protect your investment. For a deeper dive into the different types of chargers and what makes them unique, check out our complete guide on what you need to know about electric bike chargers. Ultimately, treating your charger with the same respect as your battery is the cornerstone of keeping your e-bike running for years to come.
Long-Term Storage and Maintenance Secrets
Your daily charging habits are a huge piece of the puzzle, but what about when riding season ends? Letting your bike sit for months is one of the quickest ways to kill an expensive battery.
Proper long-term storage isn’t difficult, but it’s specific. You have to get it right to make sure your battery wakes up healthy when you're ready to ride again.
Think of it like putting your battery into hibernation. The biggest mistakes I see riders make are leaving it fully charged at 100% or letting it go completely dead. Both extremes put constant stress on the battery's internal chemistry, leading to permanent capacity loss. A battery stored at 100% for a few months will degrade way faster than one stored correctly.
Finding the Storage Sweet Spot
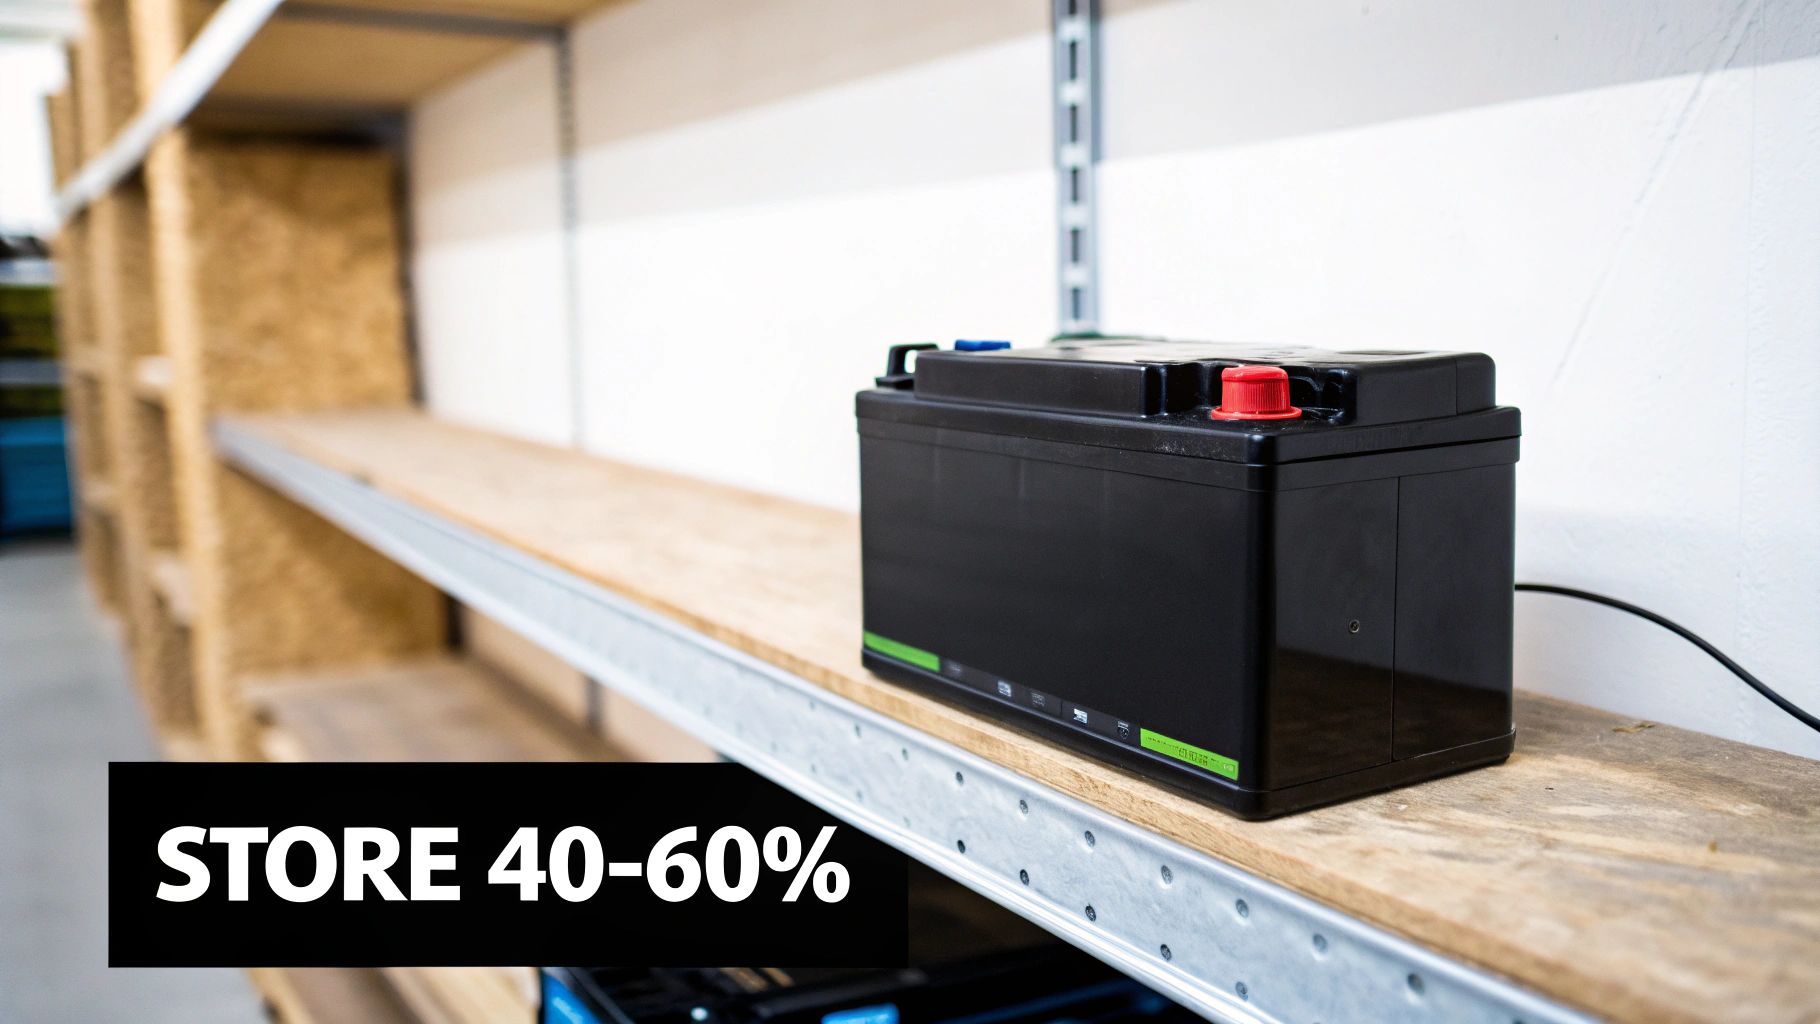
For long-term storage, the sweet spot is right in the middle. Most of us in the industry agree that a charge level between 40% and 60% is the perfect state for hibernation. At this level, the internal voltage is stable, and the chemical reactions that cause aging slow to a crawl.
It’s a simple but absolutely critical step. Before you hang up your helmet for the winter, just take the bike for a short spin to get the charge down into that range. If it’s too low, pop it on the charger just long enough to hit about 50%. This one action is the most important part of your storage routine.
Key Insight: Storing a lithium-ion battery at a 40-60% charge minimizes chemical stress and dramatically slows down the natural aging process. Leaving it at 100% or 0% for extended periods will permanently cut its maximum capacity.
Creating the Ideal Hibernation Cave
Once your battery is at the right charge level, you need to find it a good home for the off-season. Just like with charging, the environment is everything. Your mission is to find a spot that’s cool, dry, and stable.
Here’s what you’re looking for:
- Cool, Not Cold: Find a place where the temperature stays between 40°F and 70°F (4°C and 21°C). An insulated garage, basement, or even a closet in your house works great.
- Avoid Temperature Swings: A spot with a steady temperature is far better than one with big day-to-night fluctuations.
- Keep It Dry: Humidity can cause corrosion on the battery terminals, so always store it indoors in a dry area.
- Out of Direct Sunlight: UV rays and heat from the sun can wreck the battery casing and degrade the cells inside.
Whatever you do, don't store your battery in an uninsulated shed, outdoors, or anywhere it could freeze or bake in the heat. Freezing can cause permanent internal damage, while high heat just accelerates its decline.
The Monthly Check-Up Routine
Putting your battery away isn't a "set it and forget it" deal. Even in storage, all batteries will slowly lose some charge over time. If you forget about it all winter, you might come back to a battery that’s dropped to 0%—a state from which it might never fully recover.
To avoid this nightmare, just set a quick calendar reminder to check on it once a month.
- Wake It Up: Pull the battery out of its spot and check the charge level.
- Top It Up: If the charge has dipped below 30%, plug it in for 30-60 minutes to get it back into that 40-60% sweet spot.
- Put It Back: Return the battery to its cool, dry home.
This quick monthly check-up ensures the battery never gets dangerously low. It's the kind of proactive maintenance that truly maximizes your e-bike battery's lifespan. To get a better idea of what to expect over the years, check out our guide on how long e-bike batteries last. Follow these tips, and you can be sure your battery will be just as strong next season as it was this one.
Troubleshooting Common Charging Problems
Even when you do everything right, sometimes your e-bike battery just won’t cooperate. It’s a frustrating moment, but before you start pricing out a replacement, take a deep breath. Most charging problems aren't a sign of a dead battery; they're usually caused by something simple and easy to fix.
Let's walk through the most common charging headaches. Think of yourself as a detective, ruling out the simple stuff first before jumping to the worst-case conclusion. More often than not, the solution is much simpler and cheaper than you think.
My Battery Isn't Charging at All
This is the big one. You plug in your bike after a ride, come back hours later, and... nothing. The battery is still dead. Don't panic. Let's work through the potential culprits one by one.
First, go straight to the source: the wall outlet. Are you sure it has power? It sounds almost too simple, but you'd be surprised how often a tripped breaker or a switched-off outlet is the real issue. Grab a lamp you know works or your phone charger and test the outlet itself.
If the outlet is live, the next step is to trace the path of the electricity from the wall to your battery.
- Check the Plug: Is the charger's cord seated firmly in the wall? Give it a little push to make sure.
- Look at the Charger Brick: Does the charger itself have any lights on? Most have a power indicator that lights up as soon as they're plugged into the wall, even before connecting to the battery. No light here is a bad sign for the charger.
- Inspect Every Inch of Cable: Run your hands along the charger cables. You're looking for any weird kinks, visible frays, or damage. Pay special attention to the points where the cable enters the charger brick and the connector end—these are common stress points.
- Confirm the Battery Connection: Make sure the charger connector is pushed all the way into the battery's charge port. Sometimes it feels like it's in, but it needs an extra, firm push to "click" and make a solid connection.
Okay, so the outlet is working and all the connections look solid. Now what? Check the battery itself. Most e-bike batteries have a power button or a little charge level indicator. Press it. If you get absolutely no lights, the battery might have gone into a deep sleep or "protection mode" because it was completely drained.
Pro Tip: If the battery seems totally dead and won't respond, try this: plug in the charger and just leave it for 30 minutes. Sometimes a deeply discharged battery needs a little time for the Battery Management System (BMS) to recognize the incoming voltage and "wake up" the cells.
The Charger Light Is Blinking or Showing an Error
The little lights on your charger are its way of talking to you. A steady red usually means "I'm charging," and a steady green means "I'm done." But a blinking light is different—that’s your charger trying to tell you something is wrong. This is the moment to grab the user manual that came with your bike or charger.
Blinking lights are almost always error codes. Different brands use different signals, but here are some of the usual suspects:
- Blinking Red: This often points to a battery fault, a possible short circuit, or a temperature problem (the pack is too hot or too cold to charge safely).
- Blinking Green: This might not be an error at all. On some systems, it means the battery is nearly full and the charger is in the final "cell balancing" stage.
- Alternating Red/Green: This is typically a more serious error code. It often means there's a major fault with the charger itself or the battery's internal BMS.
If you see an error light, the first thing to do is unplug everything. Let both the battery and the charger sit for about half an hour to cool down and reset. Then, try plugging it all back in. If that same error light pops up again, it's a strong sign that either the charger has failed or the battery's brain (the BMS) has detected an internal issue. Don't keep trying to charge it. It's time to stop and contact the manufacturer or your local bike shop for help.
My Bike's Range Suddenly Seems Shorter
A sudden, noticeable drop in range is a real bummer, but it doesn't automatically mean your battery is on its last legs. Before you condemn the battery, you have to consider all the other things that gobble up power.
- Tire Pressure: This is the number one silent range killer. Seriously. Low tire pressure creates a ton of extra rolling resistance, making your motor work way harder for the same speed. Check your tires and pump them up to the recommended PSI printed on the sidewall.
- Cold Weather: Has the temperature dropped recently? Lithium-ion chemistry just doesn't perform as well in the cold. A range decrease of 20-30% is completely normal on a freezing day.
- Your Riding Style: Be honest—have you been mashing the throttle, using a higher assist level, or tackling more hills than usual? How you ride has a direct and massive impact on your battery life.
- Extra Weight: Did you just install a new rack and start carrying groceries? Any extra cargo makes the motor work harder, which will cut into your range.
If you've checked all of these things and your range is still disappointing, it might be time for a "balancing charge." This simply means charging your battery all the way to 100% and then leaving it on the charger for an extra hour or two after the light turns green. This gives the BMS enough time to equalize the voltage in all the individual cells inside the pack, which can help restore performance and give you a more accurate reading. If the problem persists after a couple of balancing charges, it could be an early sign that your battery is beginning to age and lose capacity.
E-Bike Battery Charging: Your Questions Answered
Even when you know the basics, specific questions always come up. Let's dig into some of the most common things riders ask about charging their e-bike batteries. Getting these answers straight will give you the confidence to know you're doing right by your bike.
My goal here is to clear up the confusion so you can ride with peace of mind.
Should I Leave My E-Bike Battery Plugged In Overnight?
I get this question all the time. While modern Battery Management Systems (BMS) are pretty smart and have built-in protection against overcharging, I still advise against leaving your battery on the charger overnight. It's just a good habit to get into.
Here’s why: once your battery hits 100%, a good charger will stop pumping in the main current. But if it stays plugged in, it might still send tiny "trickle charges" to keep it pegged at that maximum level. This can create a little bit of heat and add unnecessary stress to the cells over a long period.
The best practice is simple: unplug it when it’s full or when it hits your target charge level, like 80%. This completely avoids that low-level stress and is a cornerstone of smart battery care.
How Often Does My Lithium Battery Need to Be Balanced?
Following the 20-80% rule is great for day-to-day use, but your battery also benefits from a "balancing charge" up to 100% every now and then. This is a crucial maintenance step that gives the BMS a chance to reset and make sure all the individual cell groups inside the pack are at the same voltage level.
Think of it like a tune-up. When all the cells are balanced, the BMS can get an accurate reading of the battery's true capacity, which means the range estimate on your display stays reliable.
A balancing charge ensures no single group of cells is over-stressed or under-utilized. It’s like making sure everyone on a rowing team is pulling their oar with the same strength—it just makes the whole system work better and last longer.
For the average rider, doing a full balancing charge to 100% once every 10-20 charge cycles is a perfect rhythm. If you ride most days, that usually works out to about once a month. It’s the ideal complement to your daily partial-charging routine.
Can I Use a Fast Charger to Juice Up My E-Bike More Quickly?
Let me be direct here: Absolutely not. You should only ever use the charger that came with your bike or a replacement specifically certified by the manufacturer. Grabbing an unapproved fast charger is one of the riskiest things you can do.
A faster charger gets its speed by pushing more current (amps) or a higher voltage than your battery's BMS was built to handle. That's a recipe for disaster.
- Serious Heat: Forcing too much power in too fast creates a ton of heat, and heat is the mortal enemy of lithium-ion cells.
- Permanent Damage: That heat can permanently wreck the internal chemistry, slashing your battery's capacity and overall lifespan.
- Fire Hazard: In a worst-case scenario, overwhelming the BMS can trigger thermal runaway, which is a very real fire risk.
Stick with the gear you're supposed to use. The minor convenience of a faster charge just isn't worth the risk of ruining a battery that costs hundreds of dollars or, more importantly, compromising your safety.
At eBike Gang, LLC, we want you to have the knowledge to keep your ride in top shape for years to come. Check out our full lineup of powerful e-bikes and electric dirt bikes and join a community that rides with confidence.