

A solar charger for an e-bike is a pretty straightforward concept: it uses solar panels to capture sunlight and turn it into electricity to charge your bike's battery, no wall outlet needed. It's the key to unlocking some serious off-grid freedom, turning a sunny afternoon into dozens of extra miles on the trail.
Think about it—the ability to extend your adventure indefinitely, powered by nothing more than the sun.
Go Further With Solar Power For Your E-Bike

The idea of charging your electric bike with the sun isn't just for die-hard tinkerers anymore. It's become a practical solution for thousands of riders. Whether you're a daily commuter trying to shrink your carbon footprint or an overlander pushing the boundaries of your bike’s range, a solar charging setup can completely change the way you ride.
This guide will walk you through everything, step-by-step. We'll break down the components, the math, and the real-world setups so you can build a system that’s a perfect fit for you. It’s time to leave range anxiety in the dust.
Why Riders Are Turning To Solar
The draw of a solar charger for an e-bike is about more than just going green. It's about pure, unadulterated independence. For a lot of us, it’s the ultimate fix for the one thing that holds any EV back: finding a plug.
Here are the big reasons this trend is taking off:
- Radically Extended Range: This is the big one. With a solar panel in your kit, the length of your ride is no longer tied to a single battery charge. You can stop for a lunch break, top off the battery, and keep rolling.
- True Off-Grid Freedom: Solar power means you can explore remote backcountry trails, plan multi-day bikepacking epics, or camp in places miles from the nearest power line. Your e-bike becomes a self-sufficient exploration machine.
- Lower Energy Costs: Sure, there's an upfront investment, but charging with sunlight is 100% free. For daily commuters, those savings on the electricity bill really start to add up over time.
- Your Go-To Emergency Power Source: A good solar setup isn't just for the bike. It becomes a reliable power bank for charging your phone, GPS, and other critical gear when you're deep in the wilderness.
This isn't just a niche hobby; it's a rapidly expanding market. The electric bike solar charger market is on track to jump from USD 200 million in 2024 to a projected USD 960 million by 2032. This boom is fueled by huge leaps in solar cell efficiency—modern panels can deliver up to 30% higher output than older models. You can dive deeper into the numbers by checking out the full research on e-bike solar charger market trends.
Choosing Your Solar Charger Setup
Not all solar charging solutions are built the same. What works for a weekend warrior hitting local trails is overkill for a daily commuter and insufficient for a cross-country tourer. Getting a handle on the main types of setups is the first step in designing your own.
This table provides a quick overview of the three primary types of solar charging setups, their ideal use cases, pros, and cons to help you decide which path is right for you.
Choosing Your Solar Charger Setup
| Setup Type | Best For | Key Advantage | Main Consideration |
|---|---|---|---|
| Portable Foldable Panel | Trailside charging, bikepacking, and weekend trips. | Lightweight and compact, easily stowed in a pannier. | Lower wattage means longer charge times, best for topping off. |
| Fixed Panel (Trailer/RV) | Long-distance touring, overlanding, and base camp setups. | Higher wattage provides faster and more reliable charging. | Requires a support vehicle or trailer for transport. |
| Direct Integration | Experimental DIY projects and dedicated solar e-bikes. | Always charging when the bike is in the sun, even while riding. | Complex to install, adds weight, and offers minimal output. |
Each of these approaches has its place. The portable panel is by far the most popular for its versatility, but a fixed panel on a support trailer is the gold standard for serious, long-haul trips where reliable power is non-negotiable.
Understanding Your Solar Charging Components
Putting together a solar charging system for your e-bike is a lot like building a custom rig. Every part has a specific job, and they all need to play nicely together to turn sunshine into miles on the trail. Once you get a handle on the core components, the whole process becomes much less intimidating, and you can build a setup that’s actually right for you.
Think of it as a four-part system: the solar panel, the charge controller, your e-bike battery, and all the wiring that links them up. Let's dig into what each piece does.
The Solar Panel: The Power Collector
This is the most obvious part of your setup—the big rectangle that soaks up the sun. When you're shopping for panels, you'll see wattage ratings like 50W, 100W, or 180W. It's important to remember that this number is its maximum potential output in a perfect lab setting, which is a world away from a dusty trail or a partly cloudy afternoon.
To really get what's happening, it helps to understand the basic components of a solar panel and how they work. In the real world, things like cloud cover, the angle of the sun, and even high temperatures will chip away at that number. A good rule of thumb is to expect about 70-85% of the panel's rated wattage on a really good, clear day.
For a portable solar charger for an e-bike, you'll mostly run into two types of panels:
- Monocrystalline Panels: These are the blacker, more uniform-looking ones. They're generally more efficient, especially in low-light situations, making them a great pick for those compact, foldable setups you can stuff in a backpack.
- Polycrystalline Panels: These have that classic blue, marbled look. They're usually a bit cheaper but not quite as efficient, so they make more sense for larger, fixed setups where you have plenty of space and aren't as worried about squeezing out every last watt.
The Charge Controller: The Brains of the Operation
If the panel is the muscle, the charge controller is the brain. You can't just plug a panel directly into your battery—that's a recipe for disaster. This little box sits in between, managing the flow of power to make sure your battery gets a safe, steady, and efficient charge.
It’s an absolutely essential safety device. It prevents overcharging, which will cook your expensive lithium-ion battery in no time. It also blocks reverse current, so it won’t let your battery slowly drain its power back into the panel overnight.
You'll find two main kinds of controllers:
- PWM (Pulse Width Modulation): These are the simpler, cheaper option. Think of them as a basic on-off switch that feathers the power to regulate voltage. They work, but they aren't the most efficient.
- MPPT (Maximum Power Point Tracking): These are the smart ones. An MPPT controller is way more advanced, constantly adjusting its settings to squeeze every last drop of power out of your panel. This can boost your charging efficiency by up to 30%, especially on those cold or overcast days. For most e-bike setups, an MPPT controller is absolutely worth the extra money.
My Advice: Always get a charge controller with higher voltage and amperage ratings than your panel's output. For a 100W panel that puts out around 5.5 amps at 18 volts, a 10A controller gives you a comfortable safety buffer.
Your E-Bike Battery: The Energy Tank
This is where all that hard-won solar energy ends up. The single most important thing here is matching your solar setup to your battery's voltage—usually 36V, 48V, or 52V. Your charge controller must be set to output the correct voltage for your specific battery.
Getting this wrong is catastrophic. Pushing the wrong voltage can permanently damage your battery cells or worse. Always triple-check your battery's specs before you connect anything. If you want to dive deeper into keeping your battery healthy, our guide on electric bike chargers has a ton of useful info.
Wiring and Connectors: The Nervous System
Finally, you have the wires and connectors that tie it all together. This is not the place to cheap out. Using wires that are too thin (which, confusingly, is a higher gauge number) creates resistance, causing a "voltage drop." That means you're losing precious power before it even gets to your battery. It can also be a serious fire hazard.
For most portable solar setups between 50W and 200W, a good 10 or 12-gauge AWG wire is the way to go. Make sure you use high-quality, weatherproof connectors—MC4 connectors are the industry standard for a reason. They create a secure, waterproof link that you can rely on. A clean, well-organized wiring job isn't just for looks; it's the signature of a safe and efficient system.
How To Calculate Your Ebike Power Needs
Getting the math right on your power needs is probably the single most important part of this whole project. Get it wrong, and you’ll either end up with a panel that can’t keep up with your riding or a bulky, oversized system that’s a pain to haul around. The goal is to find that sweet spot.
It all starts with a simple question: how much juice does your e-bike battery actually hold? Once we know that, we can figure out what it'll take to fill it back up using the sun. Don't worry, the math isn't as scary as it sounds.
This simple diagram shows how power flows from the sun through your components to charge your battery.
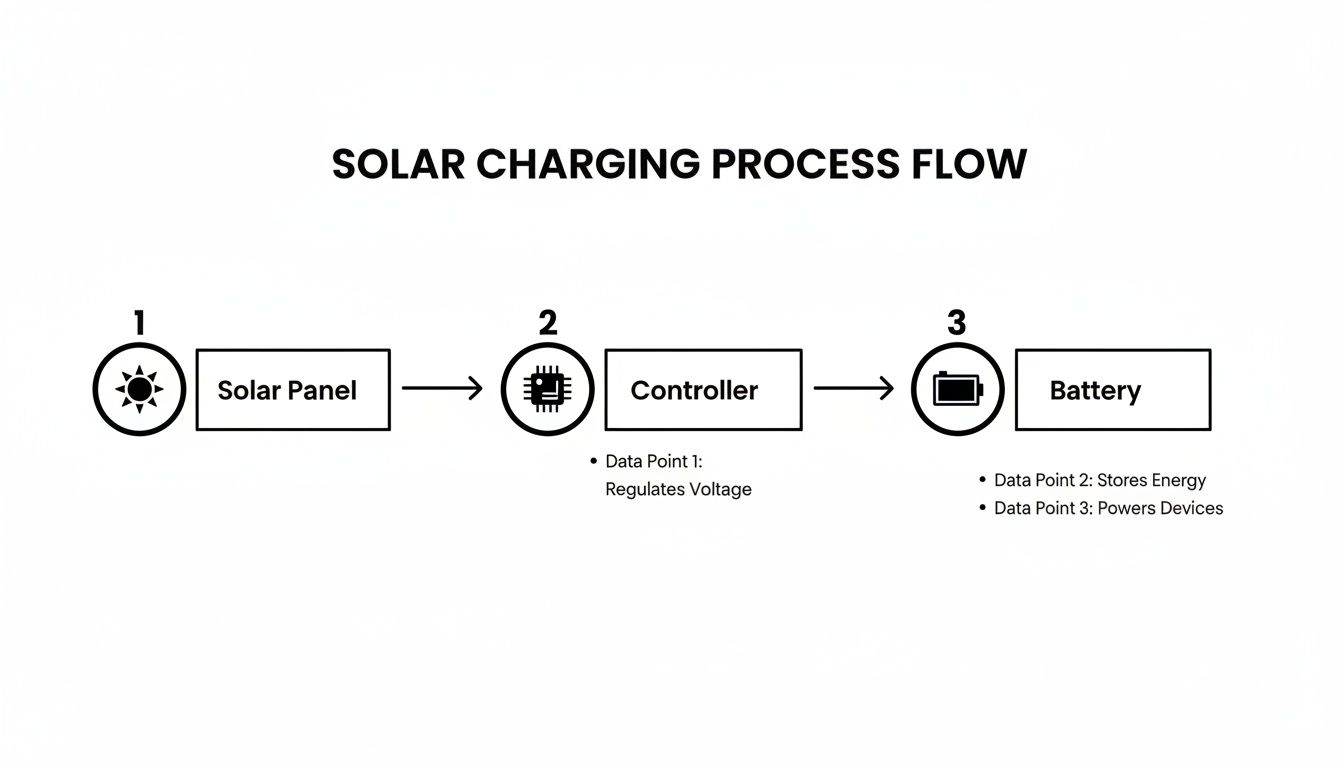
As you can see, the charge controller is the brains of the operation, making sure the power from the panel is delivered to the battery safely and efficiently.
Find Your Battery Capacity in Watt-Hours
First things first, you need to know the size of your energy "tank." We measure this in Watt-hours (Wh), which is the best measure of total energy storage. Most e-bike batteries have this printed right on the label. If not, it's a breeze to calculate.
Grab your battery and look for two numbers: its Voltage (V) and its Amp-hours (Ah).
The Formula: Voltage (V) × Amp-hours (Ah) = Watt-hours (Wh)
So, if you have a pretty standard 48V battery with a 15Ah rating, the calculation is just 48 x 15, which gives you 720Wh. This number—720Wh in our example—is your target. It's the total amount of energy your solar setup needs to produce to take a completely dead battery back to 100%.
If you want to get a better handle on how voltage, amps, and capacity all relate, our battery voltage chart breaks it down nicely.
Determine Your Peak Sun Hours
Here’s a dose of reality: the sun isn't at full blast from sunrise to sunset. We measure the useful sunlight in a day with a metric called Peak Sun Hours. This is the number of hours where the sun is intense enough for your panel to actually produce its rated wattage. It's totally different from "daylight hours."
- Out in sunny Arizona in the middle of summer? You might get 6-7 Peak Sun Hours.
- Stuck in the Pacific Northwest in winter? You might be lucky to see 2-3 Peak Sun Hours.
For most people in most places, planning for 4 to 5 Peak Sun Hours is a safe, realistic bet. It’s a good number to use for your calculations so you don't come up short on a less-than-perfect day.
Calculate The Required Solar Panel Wattage
Okay, let's put it all together and figure out what size panel you need. We're going to use our 720Wh battery example and assume we have 4 Peak Sun Hours to work with.
1. Account for Real-World Losses
No solar setup is 100% efficient. You’re going to lose some power to heat, wire resistance, and the controller itself. A good rule of thumb is to factor in a 15-20% loss. To play it safe, let's aim to generate 20% more energy than our battery holds.
- 864Wh = 720Wh × 1.20
2. Divide by Your Sun Hours
Now, just take that adjusted energy target and divide it by your available Peak Sun Hours.
- 216 Watts = 864Wh / 4 hours
And there it is. To reliably charge that 720Wh battery from zero to full on a typical day, you’d need a solar panel (or a combination of panels) that can produce at least 216W.
Pro Tip: This math assumes you're charging a completely dead battery every single day. Most of us aren't! If you typically only use half your battery on a daily ride, you could easily get by with a much smaller and more portable 100W panel. It’s all about tailoring the system to how you actually ride.
Building Your Portable Or Fixed Solar Setup
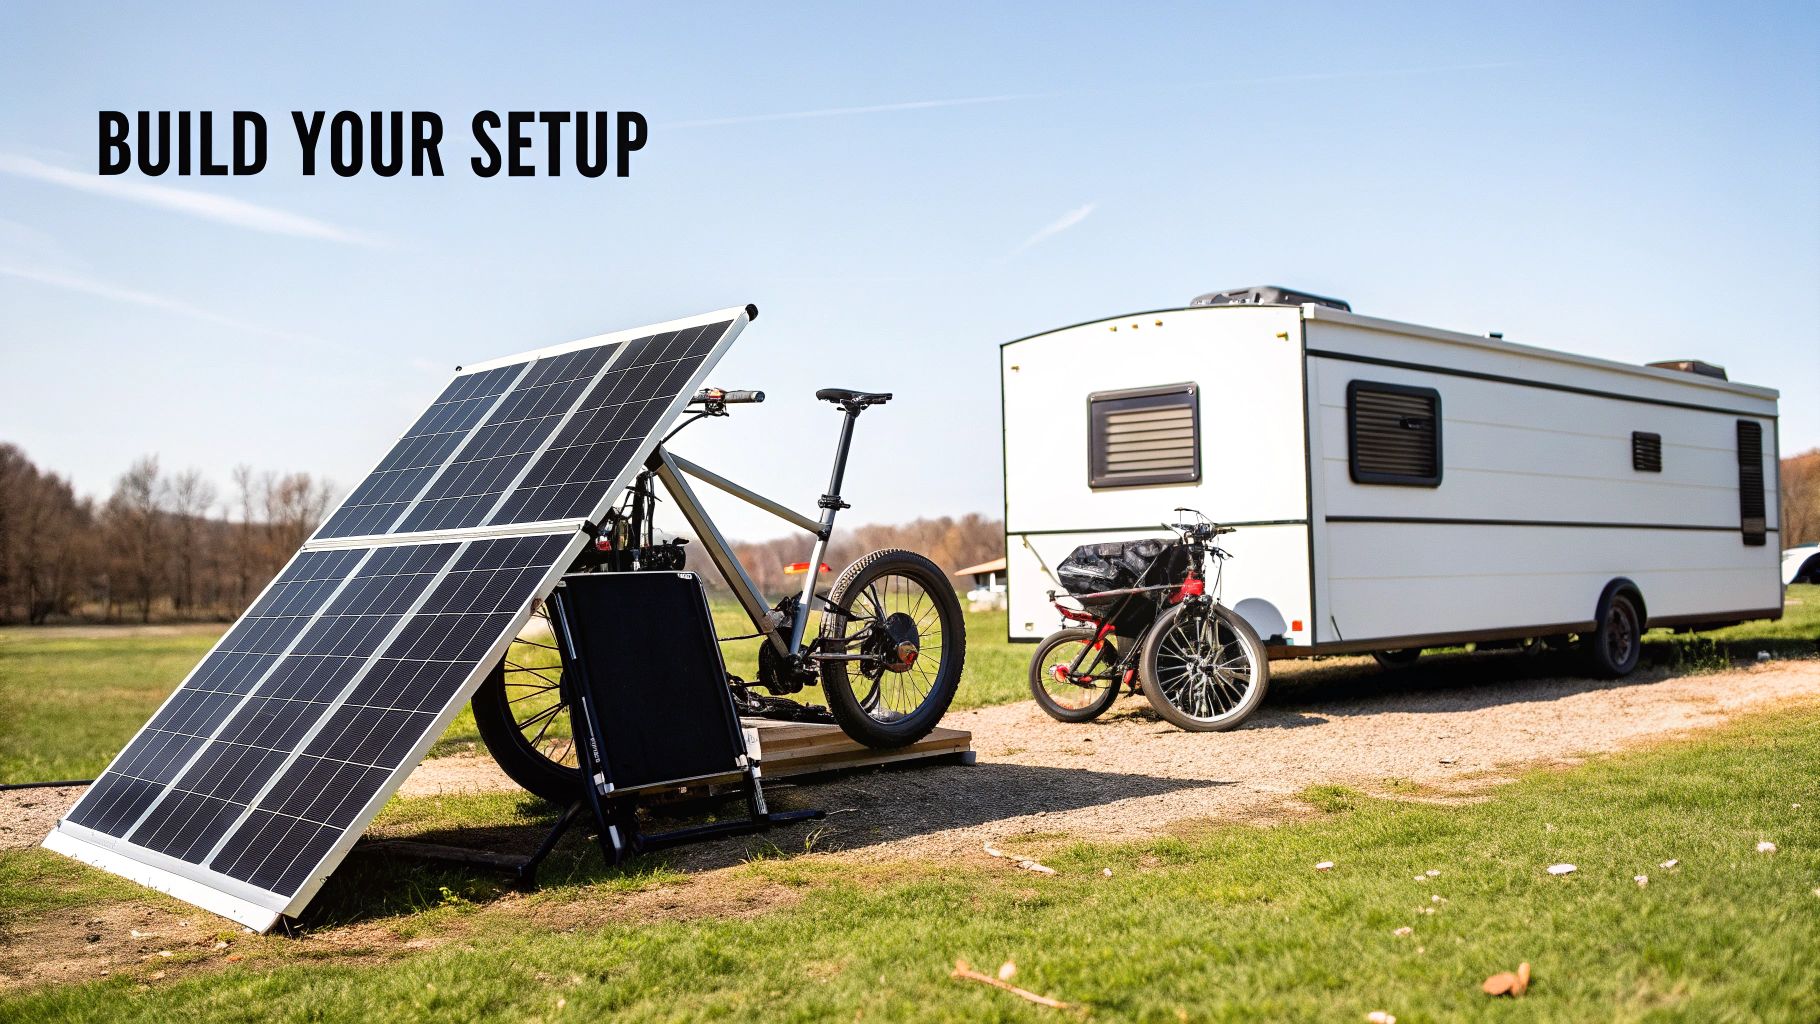
Alright, you’ve picked out your components. Now for the fun part: putting it all together. This is where your solar charger goes from a pile of parts to a legitimate, functional power source for your bike. The path you take really depends on your riding style and needs.
Are you a weekend warrior who just needs a light, packable kit for a quick top-up at the trailside? Or are you a serious tourer with a support van that can handle a more permanent, high-power installation? We’ll cover both, focusing on the practical steps to get you up and running safely.
Assembling a Go-Anywhere Portable Kit
A portable solar setup is all about being nimble and convenient. The goal here is a self-contained kit you can throw in a bag, deploy in a few minutes, and hook up to your e-bike battery without any drama. Think of it as your personal, off-grid power station for bikepacking trips or long days exploring the backcountry.
Simplicity is key. You want to spend less time fiddling with wires and more time soaking up the sun. Quick-disconnect plugs are a massive help, making the connection between your panel, controller, and battery fast and foolproof.
Here’s how I typically put one together:
- Mount the Charge Controller: The easiest way to keep things tidy is to secure your MPPT charge controller right to the back of your foldable solar panel. Many panels come with a built-in pouch just for this, which turns the two main components into one handy unit.
- Connect Panel to Controller: Use a short, heavy-enough wire (a 12 AWG cable usually does the trick) with MC4 connectors to link the panel’s output to the controller's "PV" or "SOLAR" input. Pay very close attention to polarity here: red to red (+), black to black (-).
- Create the Battery Output Cable: This is the lifeline to your e-bike. One end connects to the controller's "BATTERY" terminals. The other end needs the specific plug for your e-bike's charging port. This is the part you'll need to get right for your specific bike model.
Safety First, Always: Before you even think about plugging this into your expensive e-bike battery, grab a multimeter. Test the output voltage from the charge controller. It absolutely must match your battery’s required charging voltage (like 54.6V for a 48V battery). Getting this wrong can kill your battery.
Crafting a Robust Fixed Installation
For those of you with a camper van, RV, or even a small trailer, a fixed or semi-permanent setup is a game-changer. It offers way more power and rock-solid reliability. Bolting a rigid panel to the roof means it's constantly ready to generate juice, whether you're driving to the trailhead or parked for the night.
This approach takes a bit more planning, especially when it comes to wiring and weatherproofing. You'll be drilling holes, so measuring twice and sealing once is the mantra to avoid leaks and electrical headaches later on.
It’s no surprise setups like this are getting popular. The whole solar e-bike market is projected to explode from USD 1.66 billion in 2030 to an incredible USD 6.01 billion by 2040. Riders want more range and freedom from the grid, especially with powerful hub motors on bikes like the VETRA BLAZER and the long-lasting lithium-ion batteries that are now standard.
Key Steps for a Fixed System
- Secure Panel Mounting: Don't mess around here. Use proper, vehicle-grade mounting brackets designed for solar panels. Bolt them securely through the roof structure and use a quality sealant like Dicor around every single hole to make it completely waterproof.
- Smart Cable Routing: Run your solar cables through a weatherproof cable entry gland. This little device gives you a clean, sealed entry point into your vehicle, protecting your connections from rain, dust, and road grime.
- Centralize Your Components: Mount the charge controller, fuses, and any circuit breakers inside the vehicle, preferably close to the auxiliary battery you're using as your power bank. This keeps all the sensitive electronics safe from the elements. If you're planning a more elaborate home base, an EV charging station installation cost calculator can give you a ballpark idea of the costs involved.
The Non-Negotiable Safety Checklist
Whether your setup is portable or bolted down, these safety checks are absolutely essential. Electricity isn't something to be careless with, and a few minutes of diligence will save you from frying your expensive gear. Our guide on how to store lithium batteries safely is also a great read for understanding how to handle these powerful batteries.
- Fuse Everything: A fuse on the positive wire between the charge controller and the battery is mandatory. It's your first line of defense against a short circuit.
- Verify Polarity: I'll say it again: double- and triple-check your positive and negative connections. Getting them backward can instantly destroy your charge controller or your battery's management system (BMS).
- Use Proper Wire Gauge: Don't cheap out on wire. Thicker wires (which means a lower AWG number) have less resistance, which means less power loss and less heat buildup. This is especially important for the longer wire runs in a fixed setup.
- Isolate Connections: Make sure every connection is tight and completely insulated. I like to use heat-shrink tubing over my crimped or soldered connectors for a clean, professional, and weather-resistant finish.
Real-World Ebike Solar Charging Scenarios
All the math and component-matching in the world can't replace seeing a setup in action. The theory is essential, but it’s the real-world examples that provide a blueprint you can actually follow and adapt for your own rides.
Let's look at three different riders. Each one tailored their solar setup to a specific need, from a daily city commute to a full-blown, off-grid expedition. These stories break down the gear they chose, the power they needed, and the results they got out on the road.
The Daily Commuter: Alex
Alex is a classic city rider with a 15-mile round-trip commute. The goal here isn't to live completely off the grid—it's to chip away at the household electricity bill and have a solid backup charging plan. The challenge? No outdoor outlet at the office, but a great south-facing window.
For this situation, a compact and portable solution was the obvious answer.
- Solar Panel: A 50W foldable monocrystalline panel. It’s small enough to toss in a pannier bag and doesn't add any real weight to the ride.
- System Logic: Alex's 500Wh battery is usually only down by 30% after the morning commute. That means only about 150Wh needs to be replenished during the workday.
- Real-World Performance: By simply propping the panel up in the office window, Alex generates more than enough power to top off the battery by 5 PM. This simple habit has pretty much eliminated their e-bike's impact on their electric bill.
This kind of small-scale charging is catching on fast. As cities get more congested, government incentives and clean energy policies are fueling the solar charger market. The Asia-Pacific region, for instance, is projected to hold a 35.1% market share in 2024 as more riders turn to solar to cut costs.
Plus, the tech is getting better. New flexible perovskite cells are boasting up to 30% better efficiency, making compact 50-100W foldable chargers more powerful than ever. You can dive deeper into these trends in the global solar charger market report.
The Weekend Adventurer: Maya
Maya is a mountain biker who disappears on multi-day bikepacking trips. For her, a solar charger isn't about saving a few bucks; it's the key piece of gear that makes her adventures possible in national forests where outlets are a fantasy.
She needed a setup that balanced raw power with packability.
- Solar Panel: A rugged 100W foldable solar panel. This gives her a serious power boost but is still manageable enough to strap to her rear rack.
- System Logic: Her e-mountain bike's big 720Wh battery can be 60-70% drained after a tough day of climbing. She needs to get back around 500Wh to be ready for the next day.
- Real-World Performance: Maya’s trick is to get her panel set up the second she makes camp, catching all the late-afternoon sun. With 4-5 good hours of sunlight, her 100W panel can fully recharge her battery, getting her ready for another big day on the trail.
Maya's biggest lesson was learning to charge opportunistically. She never waits for the battery to hit empty. If she stops for a long lunch, the panel comes out. She's constantly topping off her energy reserves.
The Off-Grid Tourer: Ben
Ben is the ultimate road warrior, on a six-month-long cross-country tour with a support van as his rolling base camp. His e-bike is for exploring once he’s parked, so for him, power and absolute reliability are non-negotiable.
His setup is a semi-permanent beast built for maximum output.
- Solar Panels: Two rigid 180W monocrystalline panels are permanently bolted to the roof of his van. This 360W array is overkill for the e-bike alone, but it powers his whole life.
- System Logic: The panels feed a large auxiliary battery bank inside the van. This bank then runs his e-bike charger, a fridge, lights, and a laptop. This completely decouples his charging from the sun—he can charge the bike anytime, day or night, rain or shine.
- Real-World Performance: Ben's system is a powerhouse. Even on overcast days, the 360W array generates more than enough juice to recharge his 625Wh e-bike battery while keeping his other gear running. He's achieved total energy independence on his journey.
Answering Your Top Ebike Solar Charging Questions
Jumping into solar charging for your ebike can feel like venturing into new territory, and it's totally normal to have questions. Getting the right answers is the key to building a reliable setup, especially when you plan on being miles from the nearest outlet.
Let's walk through some of the most common questions I get from riders who are just starting out. Consider this your final pre-flight check before you start buying components. We'll cover everything from cloudy-day performance to the long-term health of your pricey ebike battery.
Can I Still Charge My Ebike on a Cloudy Day?
Yes, absolutely—you just have to adjust your expectations. Modern monocrystalline panels are surprisingly efficient and will still generate power on overcast days, but the output will drop off significantly. A panel rated for 100W in bright, direct sun might only put out 10-25W under a thick blanket of clouds.
What does that mean in practical terms? You won't be getting a fast charge, but you can definitely trickle-charge your battery and claw back some range. Think of it less as a full recharge and more as a way to slow down the drain on your battery throughout the day.
My best advice for cloudy days is to be an opportunistic charger. If the sun breaks through the clouds for even 30 minutes, get that panel aimed and soak up every watt you can. It all adds up.
Will a Solar Charger Damage My Ebike Battery?
Not if you do it right. A properly designed solar charging system is completely safe for your ebike battery. The non-negotiable component here is the MPPT charge controller. This little box is the brains of the operation, acting as a gatekeeper to regulate the voltage and current flowing from the panel. It ensures your battery gets a stable, clean charge that it can safely handle.
Whatever you do, never, ever connect a solar panel directly to your battery. That's a recipe for disaster. It sends a wild, unregulated voltage straight to the battery management system (BMS), which can fry the cells and cause permanent damage. Always use a quality charge controller that’s been correctly set for your battery’s specific voltage.
How Long Does It Take to Charge an Ebike with Solar?
This is the classic "how long is a piece of string?" question, because the answer truly depends on a handful of variables:
- Panel Wattage: A bigger panel means faster charging. A 200W setup will charge roughly twice as fast as a 100W one.
- Battery Size: Filling up a massive 720Wh battery is obviously going to take longer than a smaller 400Wh pack.
- Sunlight Intensity: The difference between charging at high noon on a clear summer day versus a hazy spring afternoon is huge.
- Battery's Starting Point: Topping off the last 20% is way faster than charging a battery from completely dead.
For a rough benchmark, you can expect a 100W solar panel in good sun to generate about 400-500Wh over the course of a full day (we're talking 5-6 peak sun hours). So, for a standard 500Wh ebike battery that's down to 50%, you're looking at a full charge in about 3-4 hours of strong, direct sunlight.
Can I Charge My Ebike While Riding?
While it’s technically possible, it's just not practical for most of us. To generate any meaningful charge, you'd need a pretty big panel, and finding a way to mount it on your bike without it becoming a clumsy, wind-catching sail is a real challenge. Plus, you'd have to constantly keep it angled perfectly at the sun, which is impossible while you're focused on the road or trail.
A much better approach is to use your ride time to charge smaller gear. A small, flexible panel strapped to a rear rack or pannier can easily keep your GPS, phone, or power bank topped up. Save the serious ebike charging for when you're stopped. Your lunch break or your evening campsite is the perfect time to unfold the panels, get them aimed perfectly, and let the sun do its work.
Ready to cut the cord and power your adventures with the sun? The eBike Gang team is here to help you gear up for true off-grid freedom. Check out our high-performance electric bikes and dirt bikes designed to take you further.